要建立自己的自主机器人,首先,必须要建立自己的机器人模型,
URDF(Unified Robot Description Format)模型。
Part 3 建立机器人URDF模型
机器人URDF模型主要由两个文件组成:.xacro 是主文件,包含URDF项,包括关节,连杆;.gazebo包含gazebo的具体信息以便在gazebo中仿真。 例子请见:How to Build a Differential Drive Simulation 以下工程的源码下载地址请见: http://download.csdn.net/download/ziqian0512/9816156 使用方法主要包括以下三个部分: rviz查看机器人
<code class="hljs avrasm has-numbering">roslaunch neurobot_description neurobot_rviz<span class="hljs-preprocessor">.launch
</span></code>
gazebo 仿真
<code class="hljs avrasm has-numbering">groslaunch neurobot_gazebo neurobot_world<span class="hljs-preprocessor">.launch</span>
</code>
控制机器人运动
<code class="hljs rust has-numbering">rostopic <span class="hljs-keyword">pub</span> /cmd_vel geometry_msgs/Twist <span class="hljs-string">"linear:
  x: 0.1
  y: 0.0
  z: 0.0
angular:
  x: 0.0
  y: 0.0
  z: 0.0"
</span></code>
如何一步步设计自己的工程请见以下部分的详细说明:
1. 创建工程
<code class="hljs has-numbering">catkin_create_pkg neurobot_description
</code>
2. 差分驱动模型
<code class="hljs avrasm has-numbering">neurobot_description/urdf/
├── macros<span class="hljs-preprocessor">.xacro</span>   帮助简化的宏
├── materials<span class="hljs-preprocessor">.xacro</span>  材料说明
├── neurobot<span class="hljs-preprocessor">.gazebo</span> gazebo具体信息
└── neurobot<span class="hljs-preprocessor">.xacro</span> URDF 主文件
</code>
 在
在neurobot.xacro中添加chassis, wheels,
添加chassis
  <link name='chassis'>
    <pose>0 0 0.1 0 0 0</pose>

    <inertial>
      <mass value="15.0"/>
      <origin xyz="0.0 0 0.1" rpy=" 0 0 0"/>
      <inertia
          ixx="0.1" ixy="0" ixz="0"
          iyy="0.1" iyz="0"
          izz="0.1"
      />
    </inertial>

    <collision name='collision'>
      <geometry>
        <box size=".4 .2 .1"/>
      </geometry>
    </collision>

    <visual name='chassis_visual'>
      <origin xyz="0 0 0" rpy=" 0 0 0"/>
      <geometry>
        <box size=".4 .2 .1"/>
      </geometry>
    </visual>


    <collision name='caster_collision'>
      <origin xyz="-0.15 0 -0.05" rpy=" 0 0 0"/>
      <geometry>
        <sphere radius="0.05"/>
      </geometry>
      <surface>
        <friction>
          <ode>
            <mu>0</mu>
            <mu2>0</mu2>
            <slip1>1.0</slip1>
            <slip2>1.0</slip2>
          </ode>
        </friction>
      </surface>
    </collision>

    <visual name='caster_visual'>
      <origin xyz="-0.15 0 -0.05" rpy=" 0 0 0"/>
      <geometry>
        <sphere radius="0.05"/>
      </geometry>
    </visual>

    <collision name='caster_front_collision'>
      <origin xyz="0.15 0 -0.05" rpy=" 0 0 0"/>
      <geometry>
        <sphere radius="0.05"/>
      </geometry>
      <surface>
        <friction>
          <ode>
            <mu>0</mu>
            <mu2>0</mu2>
            <slip1>1.0</slip1>
            <slip2>1.0</slip2>
          </ode>
        </friction>
      </surface>
    </collision>

    <visual name='caster_front_visual'>
      <origin xyz="0.15 0 -0.05" rpy=" 0 0 0"/>
      <geometry>
        <sphere radius="0.05"/>
      </geometry>
    </visual>

  </link>
添加差分驱动轮子
  <link name="left_wheel">
    <!--origin xyz="0.1 0.13 0.1" rpy="0 1.5707 1.5707"/-->
    <collision name="collision">
      <origin xyz="0 0 0" rpy="0 1.5707 1.5707"/>
      <geometry>
        <cylinder radius="0.1" length="0.05"/>
      </geometry>
    </collision>
    <visual name="left_wheel_visual">
      <origin xyz="0 0 0" rpy="0 1.5707 1.5707"/>
      <geometry>
        <cylinder radius="0.1" length="0.05"/>
      </geometry>
    </visual>
    <inertial>
      <origin xyz="0 0 0" rpy="0 1.5707 1.5707"/>
      <mass value="5"/>
      <inertia
        ixx=".1" ixy="0.0" ixz="0.0"
        iyy=".1" iyz="0.0"
        izz=".1"/>
    </inertial>
  </link>
添加hinges链接wheels和chassis
  <joint type="continuous" name="left_wheel_hinge">
    <origin xyz="0 0.15 0" rpy="0 0 0"/>
    <!--origin xyz="0.1 0.13 0" rpy="0 1.5707 1.5707"/-->
    <child link="left_wheel"/>
    <parent link="chassis"/>
    <axis xyz="0 1 0" rpy="0 0 0"/>
    <limit effort="10000" velocity="1000"/>
    <joint_properties damping="1.0" friction="1.0"/>
  </joint>

  <joint type="continuous" name="right_wheel_hinge">
    <origin xyz="0 -0.15 0" rpy="0 0 0"/>
    <!--origin xyz="0.1 -0.13 0" rpy="0 1.5707 1.5707"/-->
    <child link="right_wheel"/>
    <parent link="chassis"/>
    <axis xyz="0 1 0" rpy="0 0 0"/>
    <limit effort="10000" velocity="1000"/>
    <joint_properties damping="1.0" friction="1.0"/>
  </joint>
要实现自主导航还需要添加camera和laser,有了激光器和摄像头我们才能让机器人去感知外部世界。
添加camera
  <link name="camera">
    <collision>
      <origin xyz="0 0 0" rpy="0 0 0"/>
      <geometry>
        <box size="${cameraSize} ${cameraSize} ${cameraSize}"/>
      </geometry>
    </collision>

    <visual>
      <origin xyz="0 0 0" rpy="0 0 0"/>
      <geometry>
        <box size="${cameraSize} ${cameraSize} ${cameraSize}"/>
      </geometry>
      <material name="green"/>
    </visual>

    <inertial>
      <mass value="${cameraMass}" />
      <origin xyz="0 0 0" rpy="0 0 0"/>
      <box_inertia m="${cameraMass}" x="${cameraSize}" y="${cameraSize}" z="${cameraSize}" />
      <inertia ixx="1e-6" ixy="0" ixz="0" iyy="1e-6" iyz="0" izz="1e-6" />
    </inertial>
  </link>

  <joint name="camera_joint" type="fixed">
    <axis xyz="0 1 0" />
    <origin xyz=".2 0 0" rpy="0 0 0"/>
    <parent link="chassis"/>
    <child link="camera"/>
  </joint>
添加laser
 <joint name="hokuyo_joint" type="fixed">
    <axis xyz="0 1 0" />
    <origin xyz=".15 0 .1" rpy="0 0 0"/>
    <parent link="chassis"/>
    <child link="hokuyo"/>
  </joint>

  <!-- Hokuyo Laser -->
  <link name="hokuyo">
    <collision>
      <origin xyz="0 0 0" rpy="0 0 0"/>
      <geometry>
    <box size="0.1 0.1 0.1"/>
      </geometry>
    </collision>

    <visual>
      <origin xyz="0 0 0" rpy="0 0 0"/>
      <geometry>
        <mesh filename="package://neurobot_description/meshes/hokuyo.dae"/>
      </geometry>
    </visual>

    <inertial>
      <mass value="1e-5" />
      <origin xyz="0 0 0" rpy="0 0 0"/>
      <inertia ixx="1e-6" ixy="0" ixz="0" iyy="1e-6" iyz="0" izz="1e-6" />
    </inertial>
  </link>
3. 添加模型插件
只有添加了模型插件,我们才能编写代码控制机器人的运动,采用信息。插件是模型和代码的桥梁。
在neurobot.gazebo中添加gazebo具体描述信息和插件。
差分驱动
 <gazebo>
    <plugin name="differential_drive_controller" filename="libgazebo_ros_diff_drive.so">
      <legacyMode>false</legacyMode>
      <alwaysOn>true</alwaysOn>
      <updateRate>10</updateRate>
      <leftJoint>left_wheel_hinge</leftJoint>
      <rightJoint>right_wheel_hinge</rightJoint>
      <wheelSeparation>0.4</wheelSeparation>
      <wheelDiameter>0.2</wheelDiameter>
      <torque>10</torque>
      <commandTopic>cmd_vel</commandTopic>
      <odometryTopic>odom</odometryTopic>
      <odometryFrame>odom</odometryFrame>
      <robotBaseFrame>chassis</robotBaseFrame>
    </plugin>
  </gazebo>
camera
  <gazebo reference="camera">
    <material>Gazebo/Green</material>
    <sensor type="camera" name="camera1">
      <update_rate>30.0</update_rate>
      <camera name="head">
        <horizontal_fov>1.3962634</horizontal_fov>
        <image>
          <width>800</width>
          <height>800</height>
          <format>R8G8B8</format>
        </image>
        <clip>
          <near>0.02</near>
          <far>300</far>
        </clip>
      </camera>
      <plugin name="camera_controller" filename="libgazebo_ros_camera.so">
        <alwaysOn>true</alwaysOn>
        <updateRate>0.0</updateRate>
        <cameraName>neurobot/camera1</cameraName>
        <imageTopicName>image_raw</imageTopicName>
        <cameraInfoTopicName>camera_info</cameraInfoTopicName>
        <frameName>camera</frameName>
        <hackBaseline>0.07</hackBaseline>
        <distortionK1>0.0</distortionK1>
        <distortionK2>0.0</distortionK2>
        <distortionK3>0.0</distortionK3>
        <distortionT1>0.0</distortionT1>
        <distortionT2>0.0</distortionT2>
      </plugin>
    </sensor>
  </gazebo>
laser
laser的几何信息采用mesh文件hokuyo.dae放在meshes文件夹中,
  <!-- hokuyo -->
  <gazebo reference="hokuyo">
    <sensor type="gpu_ray" name="head_hokuyo_sensor">
      <pose>0 0 0 0 0 0</pose>
      <visualize>false</visualize>
      <update_rate>40</update_rate>
      <ray>
        <scan>
          <horizontal>
            <samples>720</samples>
            <resolution>1</resolution>
            <min_angle>-1.570796</min_angle>
            <max_angle>1.570796</max_angle>
          </horizontal>
        </scan>
        <range>
          <min>0.10</min>
          <max>30.0</max>
          <resolution>0.01</resolution>
        </range>
        <noise>
          <type>gaussian</type>
          <!-- Noise parameters based on published spec for Hokuyo laser
               achieving "+-30mm" accuracy at range < 10m.  A mean of 0.0m and
               stddev of 0.01m will put 99.7% of samples within 0.03m of the true
               reading. -->
          <mean>0.0</mean>
          <stddev>0.01</stddev>
        </noise>
      </ray>
      <plugin name="gazebo_ros_head_hokuyo_controller" filename="libgazebo_ros_gpu_laser.so">
        <topicName>/neurobot/laser/scan</topicName>
        <frameName>hokuyo</frameName>
      </plugin>
    </sensor>
  </gazebo
gazebo仿真材料信息
  <gazebo reference="chassis">
    <material>Gazebo/Orange</material>
  </gazebo>

  <gazebo reference="left_wheel">
    <material>Gazebo/Blue</material>
  </gazebo>

  <gazebo reference="right_wheel">
    <material>Gazebo/Blue</material>
  </gazebo>
4.机器人控制
终于到了我们可以控制自己建立的机器人了。
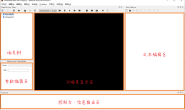
在rviz中查看自己的机器人
roslaunch neurobot_description neurobot_rviz.launch
 neurobot_rviz.launch 文件如下
<?xml version="1.0"?>
<launch>
  <param name="robot_description" command="$(find xacro)/xacro.py '$(find mybot_description)/urdf/mybot.xacro'"/>
  <!-- send fake joint values -->
  <node name="joint_state_publisher" pkg="joint_state_publisher" type="joint_state_publisher">
    <param name="use_gui" value="False"/>
  </node>
  <!-- Combine joint values -->
  <node name="robot_state_publisher" pkg="robot_state_publisher" type="state_publisher"/>
  <!-- Show in Rviz   -->
  <node name="rviz" pkg="rviz" type="rviz"/>
  <!--node name="rviz" pkg="rviz" type="rviz" args="-d $(find mybot_description)/launch/myrobot.rviz"/-->
</launch>
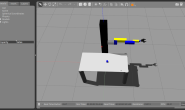
在gazebo中加载机器人并控制机器人运动
依然采用在turtlebot中使用的world场景,加载机器人。
roslaunch neurobot_gazebo neurobot_world.launch
 通过如下命令
rostopic list
我们可以找到非常重要的四个topic
/cmd_vel  速度控制命令
/neurobot/camera1/image_raw 图像信息
/neurobot/laser/scan 激光数据
/odom 里程计
使用如下命令便可以控制机器人运动了,fancy。
rostopic pub /cmd_vel geometry_msgs/Twist "linear:
  x: 0.1
  y: 0.0
  z: 0.0
angular:
  x: 0.0
  y: 0.0
  z: 0.0"
也可以使用我们之前turtlebot中使用的keyboard_teleop.launch 和keyop.launch, 将topic主题映射到/cmd_vel。
References:
How to Build a Differential Drive Simulation urdf Tutorials