一,配置环境
硬件: UR5工业机器人 Kinect V2 软件: 注意我是将下面包安装在ros下工作目录的src文件夹下 1,universal_robot(内部需要添加ur_modern_driver包) 2,iai_kinect2 (kinect v2的启动节点) 3,ros-kinetic-visp 4,vision_visp 5,aruco_ros 6,easy_handeye 具体安装过程: 提示:当下面的包安装编译通过后,在进行手眼标定前,先进行相机的内参标定: 参考网址: https://blog.csdn.net/harrycomeon/article/details/100621013 https://www.jianshu.com/p/dcc7fe02e55e https://blog.csdn.net/u010368556/article/details/81585385 1,安装universal_robot(并不局限于这个操作)
mkdir -p ~/universal_robot/src
cd ~/universal_robot/src
git clone https://github.com/ros-industrial/universal_robot.git
git clone https://github.com/ros-industrial/industrial_core.git
cd universal_robot
git clone https://github.com/beta-robots/ur_modern_driver.git
cd ~/universal_robot
catkin_make
source  ~/devel/setup.bash(不要忘记source将包添加到当前工作目录)
我是直接在ros下的bashrc文件下添加了这句话,避免每次source
gedit .bashrc
source /home/harry/catkin_ws/devel/setup.bash(前面两级目录需要根据自己的名字改变)
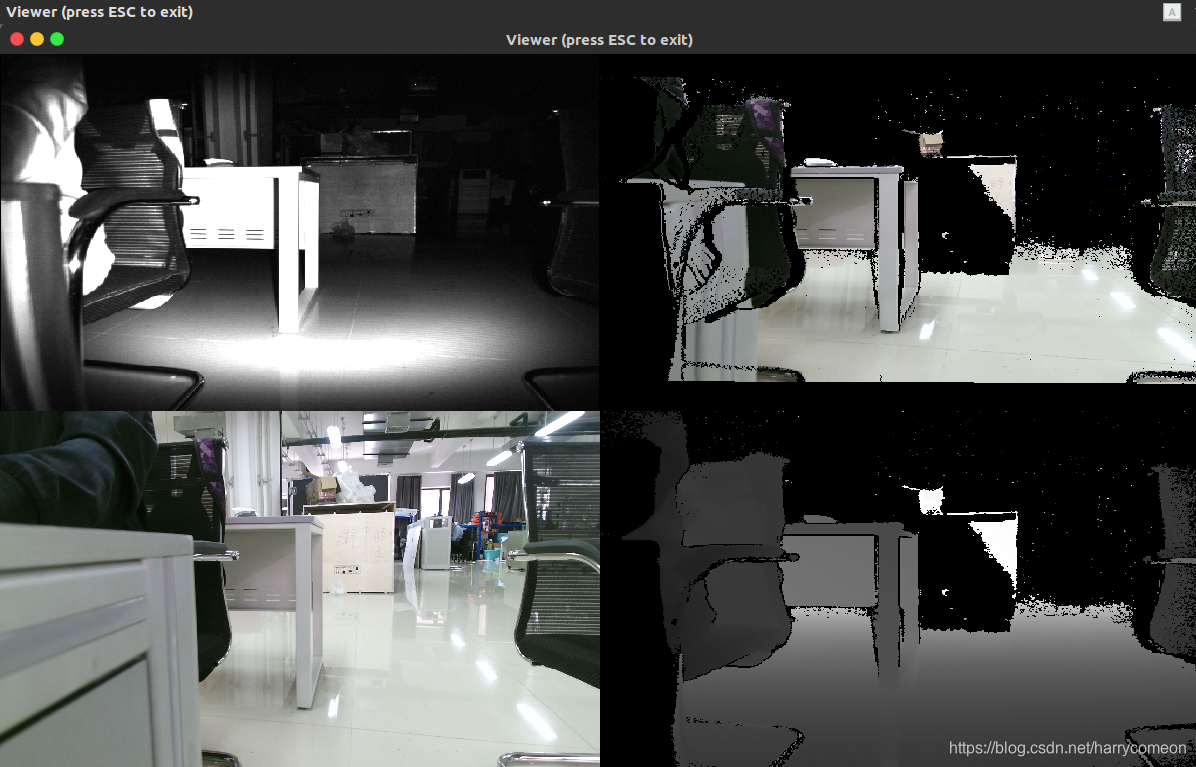
2,安装iai_kinect2 (kinect v2的启动节点) 参考网址:https://blog.csdn.net/u012424737/article/details/80609451 首先对libfreenect2 驱动配置,我是将libfreenect2 安装在home目录下,按照文章操作即可,知道在build文件夹下运行./bin/Protonect显示以下图像,便安装完驱动,下一步便是安装kinect v2的节点包,步骤如下:
 2-1在ROS中配置Kinect的是通过 IAI Kinect2 包的安装实现的
cd ~/catkin_ws/src/  #进行ROS的工作目录下的源文件目录
git clone https://github.com/code-iai/iai_kinect2.git
cd iai_kinect2
rosdep install -r --from-paths .
cd ~/catkin_ws
catkin_make
由于这里我是直接修改了bashrc,所以不用每次都source

通过运行验证是否成功,成功后显示如下图像:
roslaunch kinect2_bridge kinect2_bridge.launch
rosrun kinect2_viewer kinect2_viewer
 3,ros-kinetic-visp 直接安装到计算机目录下 :
sudo apt-get install ros-kinetic-visp
4,vision_visp
cd ~/catkin_ws/src
git clone -b kinetic-devel https://github.com/lagadic/vision_visp.git
catkin_make --pkg visp_hand2eye_calibration
针对编译会卡住的情况,把下面两个包删掉,因为这两个包编译时需要下载文件,但是文件现在不存在了,而且这两个是用于跟踪,不影响手眼标定。
 5,aruco_ros
cd ~/catkin_ws/src
 git clone -b kinetic-devel https://github.com/pal-robotics/aruco_ros
 catkin_make
6,easy_handeye ,这一步编译时间会慢一些
cd ~/catkin_ws/src
 git clone https://github.com/IFL-CAMP/easy_handeye
catkin_ws$ catkin_make
二,验证
注意****由于直接编写大的完整的roslaunch启动文件会导致系统崩溃,所以我重新对其进行拆分 我的aruco_ros/aruco_ros/launch/single.launch文件如下,这里我修改了几个参数,582和0.067分别对应的ID号和标签尺寸,这是根据我选择并打印出来的标签实际决定的:
<?xml version="1.0"?>
<launch>

    <arg name="markerId"        default="582"/>
    <arg name="markerSize"      default="0.067"/>    <!-- in m -->
    <arg name="eye"             default="left"/>
    <arg name="marker_frame"    default="aruco_marker_frame"/>
    <arg name="ref_frame"       default=""/>  <!-- leave empty and the pose will be published wrt param parent_name -->
    <arg name="corner_refinement" default="LINES" /> <!-- NONE, HARRIS, LINES, SUBPIX -->


    <node pkg="aruco_ros" type="single" name="aruco_single">
        <remap from="/camera_info" to="/kinect2/hd/camera_info" />
        <remap from="/image" to="/kinect2/hd/image_color_rect" />
          <param name="image_is_rectified" value="true"/>
        <param name="marker_size"        value="0.067"/>
        <param name="marker_id"          value="582"/>
        <param name="reference_frame"    value="kinect2_rgb_optical_frame"/>
        <param name="camera_frame"       value="kinect2_rgb_optical_frame"/>
        <param name="marker_frame"       value="camera_marker" />
    </node>

    <!--node pkg="aruco_ros" type="single" name="aruco_single">
        <remap from="/camera_info" to="/stereo/$(arg eye)/camera_info" />
        <remap from="/image" to="/stereo/$(arg eye)/image_rect_color" />
        <param name="image_is_rectified" value="True"/>
        <param name="marker_size"        value="$(arg markerSize)"/>
        <param name="marker_id"          value="$(arg markerId)"/>
        <param name="reference_frame"    value="$(arg ref_frame)"/>
        <param name="camera_frame"       value="stereo_gazebo_$(arg eye)_camera_optical_frame"/>
        <param name="marker_frame"       value="$(arg marker_frame)" />
        <param name="corner_refinement"  value="$(arg corner_refinement)" />
    </node-->

</launch>
注意:aruco标签在~/catkin_ws/src/aruco_ros/aruco_ros/etc有打印出的标签才可以被检测到,这里我直接打印的里面存在的标签号582 然后我先判断用kinect v2能否检测到aruco标签,如果显示坐标,便可以检测,注意修改image_View左边订阅的节点为 /aruco_single/result 下方为/aruco_single/result_mouse_left 运行程序:
roslaunch kinect2_bridge kinect2_bridge.launch
roslaunch aruco_ros single.launch
rqt_image_view
 现在已经可以检测到aruco标签,下面就正式开始进行手眼标定操作: 首先在easy_handeye下新建了ur5_kinectv2_calibration.launch,注意 name=“robot_ip” value=“192.168.1.107” />与实际IP相一致,代码如下:
<?xml version="1.0"?>
<launch>
    <arg name="namespace_prefix" default="ur5_kinect_handeyecalibration" />

  <arg name="robot_ip" doc="The IP address of the UR5 robot" />
		<!--<arg name="marker_frame" default="aruco_marker_frame"/>-->
   <arg name="marker_size" doc="Size of the ArUco marker used, in meters" default="0.067" />
 <arg name="marker_id" doc="The ID of the ArUco marker used" default="582" />

    <!-- start ArUco -->
    <node name="aruco_tracker" pkg="aruco_ros" type="single">
        <remap from="/camera_info" to="/kinect2/hd/camera_info" />
        <remap from="/image" to="/kinect2/hd/image_color_rect" />
        <param name="image_is_rectified" value="true"/>
        <param name="marker_size"        value="$(arg marker_size)"/>
        <param name="marker_id"          value="$(arg marker_id)"/>
        <param name="reference_frame"    value="kinect2_rgb_optical_frame"/>
        <param name="camera_frame"       value="kinect2_rgb_optical_frame"/>
        <param name="marker_frame"       value="camera_marker" />
    </node>

      <!-- start the robot -->
    <include file="$(find ur_modern_driver)/launch/ur5_bringup.launch">
        <arg name="limited" value="true" />
        <arg name="robot_ip" value="192.168.1.107" />
    </include>

    <include file="$(find ur5_moveit_config)/launch/ur5_moveit_planning_execution.launch">
        <arg name="limited" value="true" />
    </include>

</launch>
然后新建了easy.launch文件代码如下:
<?xml version="1.0"?>
<launch>
<!-- start easy_handeye -->

<arg name="namespace_prefix" default="ur5_kinect_handeyecalibration" />
    <include file="$(find easy_handeye)/launch/calibrate.launch" >
        <arg name="namespace_prefix" value="$(arg namespace_prefix)" />
        <arg name="eye_on_hand" value="false" />

        <arg name="tracking_base_frame" value="kinect2_rgb_optical_frame" />
        <arg name="tracking_marker_frame" value="camera_marker" />
        <arg name="robot_base_frame" value="base_link" />
        <arg name="robot_effector_frame" value="wrist_3_link" />

        <arg name="freehand_robot_movement" value="false" />
        <arg name="robot_velocity_scaling" value="0.5" />
        <arg name="robot_acceleration_scaling" value="0.2" />
    </include>

</launch>
注意上面: tracking_base_frame就是相机的frame, tracking_marker_frame是标志物的frame, 这两者之间的关系由aruco_ros发布, 所以要对上; robot_base_frame就是机械臂底座, robot_effector_frame是末端, 这两个跟UR5发布的要对上. 运行下面程序进行手眼标定:
roslaunch kinect2_bridge kinect2_bridge.launch
roslaunch easy_handeye ur5_kinectv2_calibration.launch
roslaunch easy_handeye easy.launch
弹出下面三个窗口:


 注意一定要在第一个图中打开image_view,显示采集到的标签图像 直到窗口顶部会出现选项目录plugins->Visualization->image_View; 图3中点击check_starting pose应该为0/17,连接成功后。 image_View下左边订阅的节点为 /aruco_single/result 下方为/aruco_single/result_mouse_left,显示如下:
 下面我们需要把aruco标签贴到机械臂末端,如图: 会出现初始化时闪退的情况,很明显此时的位置机械手不可达,所以需要重新调整下实际机械手的姿态
 这里的是在~/catkin_ws/src/easy_handeye/easy_handeye/launch/calibrate.launch发布的kinect2_rgb_optical_frame,当注释掉下面的代码则不会出现虚拟坐标
<!-- Dummy calibration to have a fully connected TF tree and see all frames -->
    <group if="$(arg publish_dummy)">
        <node unless="$(arg eye_on_hand)" name="dummy_handeye" pkg="tf" type="static_transform_publisher"
            args="1 1 1 0 1.5 0 $(arg robot_base_frame) $(arg tracking_base_frame) 10" />
        <node if="$(arg eye_on_hand)" name="dummy_handeye" pkg="tf" type="static_transform_publisher"
            args="0 0 0.05 0 0 0 $(arg robot_effector_frame) $(arg tracking_base_frame) 10" />
    </group>
三,进行手眼标定
具体操作步骤, 1,为了安全流畅地操作,我们先在rviz的Motion Planning界面中将机械臂的速度和加速度都设为0.1。
 2,图3中是否显示0/17,如果不是就按check starting pose 3,在图1中点击take sample,采样完后点击在图3界面点击next pose,再点击plan,最后点击excute后机械臂会运动到新的位置,再点击take sample,这样反复进行17次,便可以进行采集17点后,点击compute后,再点击save后,便可以在.ros隐藏文件下(在home目录下按ctrl+h便可以显示隐藏文件)看到easy_handeye的文件下的ur5_kinect_handeyecalibration_eye_on_base.yaml文件,文件内容如下:
eye_on_hand: false
robot_base_frame: base_link
tracking_base_frame: kinect2_rgb_optical_frame
transformation:
  qw: 0.1434016682482555
  qx: -0.16165056534351638
  qy: 0.7128775670495471
  qz: -0.6671661192426197
  x: -0.4258619055680306
  y: -0.03867852023257894
  z: 0.68036831927051
部分过程图如下:


 到这里,我们便完成了kinect v2相机相对于机械手基座标的姿态变化和位移,因为这里在后续程序会把base_link与世界坐标系相联系,所以可以获得相机相对于世界坐标系的变化。具体文件在~/catkin_ws/src/universal_robot/ur_description/urdf/ur5_joint_limited_robot.urdf.xacro文件下
 <link name="world" />

  <joint name="world_joint" type="fixed">
    <parent link="world" />
    <child link = "base_link" />
    <origin xyz="0.0 0.0 0.0" rpy="0.0 0.0 0.0" />
  </joint>
四,问题解决
在进行与实际机械臂连接的过程中,出现了
[ WARN] [1571458700.898480686]: Joint 'wrist_2_joint' from the starting state is outside bounds by a significant margin: [ -3.8573 ] should be in the range [ -3.14159 ], [ 3.14159 ] but the error above the ~start_state_max_bounds_error parameter (currently set to 0.1)
[ERROR] [1571461519.040367579]: Failed to fetch current robot state
可以看到主要是超过了关节的限制,然后造成了无法获取当前姿态,于是找到了下面文件 ~/catkin_ws/src/universal_robot/ur_description/urdf/ur5_joint_limited_robot.urdf.xacro 这里面包含了对关节的限制,于是将关节限制关掉,将true改成false便可以操作。代码如下:
 <!-- arm -->
  <xacro:ur5_robot prefix="" joint_limited="false"
    shoulder_pan_lower_limit="${-pi}" shoulder_pan_upper_limit="${pi}"
    shoulder_lift_lower_limit="${-pi}" shoulder_lift_upper_limit="${pi}"
    elbow_joint_lower_limit="${-pi}" elbow_joint_upper_limit="${pi}"
    wrist_1_lower_limit="${-pi}" wrist_1_upper_limit="${pi}"
    wrist_2_lower_limit="${-pi}" wrist_2_upper_limit="${pi}"
    wrist_3_lower_limit="${-pi}" wrist_3_upper_limit="${pi}"
    transmission_hw_interface="$(arg transmission_hw_interface)"
  />
参考网址: https://www.jianshu.com/p/dcc7fe02e55e https://blog.csdn.net/sinat_23853639/article/details/80276848 其实单目相机也可以进行以上过程的手眼标定,下一步会进行验证。 可以参考以下网址:https://blog.csdn.net/ecH0o0/article/details/95245858 下面便是将得到的坐标变换,发布到tf树中,待更新。。
五,发布坐标变换并用octomap显示
注意 本身easy_handeye自带的publish.launch文件需要进行修改才能使用,修改文件如下: 主要修改了第一句和第二句,这里注意第二句的namespace_prefix要跟easy.launch里的对上, 因为保存标定结果的时候文件名按照这个取的.

<?xml version="1.0"?>
<launch>
    <arg name="eye_on_hand" doc="eye-on-hand instead of eye-on-base" default="false" />
    <arg name="namespace_prefix" default="ur5_kinect_handeyecalibration" />
    <arg if="$(arg eye_on_hand)" name="namespace" value="$(arg namespace_prefix)_eye_on_hand" />
    <arg unless="$(arg eye_on_hand)" name="namespace" value="$(arg namespace_prefix)_eye_on_base" />

    <!--it is possible to override the link names saved in the yaml file in case of name clashes, for example-->
    <arg if="$(arg eye_on_hand)" name="robot_effector_frame" default="" />
    <arg unless="$(arg eye_on_hand)" name="robot_base_frame" default="" />
    <arg name="tracking_base_frame" default="" />

    <arg name="inverse" default="false" />

    <!--publish hand-eye calibration-->
    <group ns="$(arg namespace)">
        <param name="eye_on_hand" value="$(arg eye_on_hand)" />
        <param unless="$(arg eye_on_hand)" name="robot_base_frame" value="$(arg robot_base_frame)" />
        <param if="$(arg eye_on_hand)" name="robot_effector_frame" value="$(arg robot_effector_frame)" />
        <param name="tracking_base_frame" value="$(arg tracking_base_frame)" />
        <param name="inverse" value="$(arg inverse)" />
        <node name="$(anon handeye_publisher)" pkg="easy_handeye" type="publish.py" output="screen"/>
    </group>
</launch>
下面编写start.launch文件(我是放到了easy_handeye的launch文件夹下,不局限),将启动启动UR5、kinectv2、moveit、点云数据处理等写到了如下的launch文件中,文件如下:
<!-- filename: start.launch -->

<launch>
    <!-- start the robot -->
    <include file="$(find ur_modern_driver)/launch/ur5_bringup.launch">
        <arg name="limited" value="true" />
        <arg name="robot_ip" value="192.168.1.107" />
    </include>

    <include file="$(find ur5_moveit_config)/launch/ur5_moveit_planning_execution.launch">
        <arg name="limited" value="true" />
    </include>

    <include file="$(find ur5_moveit_config)/launch/moveit_rviz.launch">
        <arg name="config" value="true" />
    </include>

    <include file="$(find kinect2_bridge)/launch/kinect2_bridge.launch" />

    <include file="$(find easy_handeye)/launch/publish.launch" />

</launch>
另外,为了显示点云的octomap,我们还得添加一个点云配置文件sensors_kinect.yaml,放到ur5_moveit_confit下面,当然我们也可以使用moveit_setup_assistant工具自建moveit_config包。sensors_kinect.yaml文件的内容为:
sensors:
  - sensor_plugin: occupancy_map_monitor/PointCloudOctomapUpdater
    point_cloud_topic: /kinect2/qhd/points
    max_range: 5.0
    point_subsample: 1
    padding_offset: 0.1
    padding_scale: 1.0
    max_update_rate: 1.0
    filtered_cloud_topic: filtered_cloud
注意点云所使用的topic应当按照具体情况做对应的修改。然后我们打开ur5_moveit_config/launch文件夹下面的sensor_manager.launch.xml文件做相应的修改来使用上面的sensors_kinect.yaml文件。其实就是在后面添加
 <rosparam command="load" file="$(find ur5_moveit_config)/config/sensors_kinect.yaml" />
  <param name="octomap_frame" type="string" value="odom_combined" />
  <param name="octomap_resolution" type="double" value="0.05" />
  <param name="max_range" type="double" value="5.0" />
用来载入octomap。 最后,我们启动easy_handeye的启动文件:
roslaunch easy_handeye start.launch 在rviz下打开tf树,显示如下:

 通过rostopic echo /tf_static ,可以查看到发布了base_link到kinect2_rgb_optical_frame的变换矩阵
 这就是初步的标定结果了,现在我们就可以使用moveit更好地让我们的机械臂有外界交流了。


