添加GPS传感器
- 1. 添加GPS实体
- 2. 添加GPS 控制接口代码
- 3. 运行效果
- 参考资料
1. 添加GPS实体
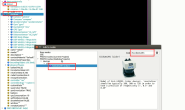
step1: 首先在机器人模型的Robot->children中添加一个GPS节点
 step2: 然后在GPS节点->children中添加一个solid固件
 step3: 设置这个solid固件的children中添加shape节点,并设置外观和形状。具体设置底部半径为0.02 高度为0.05,设置偏移量为(x=0,y=0.03,z=0)。

 这里为了区别其他传感器我们使用了这个圆锥形的形状作为GPS
 step4: 最后我们需要设置GPS传感器的名称,以便我们在程序中读取GPS传感器的数据。
 注意:添加GPS的过程中不设置boundingObject属性和 physics属性。
2. 添加GPS 控制接口代码
完整的代码块:
#include <webots/Robot.hpp>
#include <webots/GPS.hpp>
#include <webots/DistanceSensor.hpp>
#include <webots/Motor.hpp>
#include <webots/Keyboard.hpp>
#include <stdio.h>

#define TIME_STEP 64
// All the webots classes are defined in the "webots" namespace
using namespace webots;

int main(int argc, char **argv) {
  // create the Robot instance.
  Robot *robot = new Robot();
  Keyboard kb;

  DistanceSensor *ds[2];
  char dsNames[2][10] = {"ds_right","ds_left"};
  for (int i = 0; i < 2; i++) {
    ds[i] = robot->getDistanceSensor(dsNames[i]);
    ds[i]->enable(TIME_STEP);
  }

  GPS *gps;
  gps = robot->getGPS("global_gps");
  gps->enable(TIME_STEP);

  // initialise motors
  Motor *wheels[4];
  char wheels_names[4][8] = {"wheel1", "wheel2", "wheel3", "wheel4"};
  for (int i = 0; i < 4; i++) {
    wheels[i] = robot->getMotor(wheels_names[i]);
    wheels[i]->setPosition(INFINITY);
    wheels[i]->setVelocity(0);
  }
  printf("init successd ...\n");

  kb.enable(TIME_STEP);
  double leftSpeed = 0.0;
  double rightSpeed = 0.0;

   // Main loop:
  // - perform simulation steps until Webots is stopping the controller
  while (robot->step(TIME_STEP) != -1)
   {
    int key = kb.getKey();
    if(key== 315)
    {
      leftSpeed = 3.0;
      rightSpeed = 3.0;
    }
    else if(key== 317)
    {
      leftSpeed = -3.0;
      rightSpeed = -3.0;
    }
    else if(key== 314)
    {
      leftSpeed = -3.0;
      rightSpeed = 3.0;
    }
    else if(key== 316)
    {
      leftSpeed = 3.0;
      rightSpeed = -3.0;
    }
    else
    {
      leftSpeed = 0.0;
      rightSpeed = 0.0;
    }
    std::cout<< " Right Sensor Value:" <<ds[0]->getValue() << "  Left Sensor Value:" <<ds[1]->getValue() <<std::endl;
    std::cout<< "GPS Value X: " <<gps->getValues()[0]
    << " Y: " <<gps->getValues()[1]<< " Z: " <<gps->getValues()[2] <<std::endl;

     wheels[0]->setVelocity(leftSpeed);
     wheels[1]->setVelocity(rightSpeed);
     wheels[2]->setVelocity(leftSpeed);
     wheels[3]->setVelocity(rightSpeed);
  };

  // Enter here exit cleanup code.

  delete robot;
  return 0;
}
相比于利用键盘控制小车的demo,在这里增加了GPS初始化和打印GPS信息两个部分。 在控制器中增加代码块,用于初始化GPS
  GPS *gps;
  gps = robot->getGPS("global_gps");
  gps->enable(TIME_STEP);
打印GPS传感器的值
    std::cout<< "GPS Value X: " <<gps->getValues()[0]
    << " Y: " <<gps->getValues()[1]<< " Z: " <<gps->getValues()[2] <<std::endl;
GPS传感器的接口函数可以在[1]处查到各语言版本的接口类型,这里我们只用到了 enable 和 getValues 两个函数。

3. 运行效果
在console框中可以看到输出的GPS信息,GPS安装的有点难看,美化的工作就留给大家了。 修改的模型文件可在此处下载

参考资料
[1] https://cyberbotics.com/doc/reference/gps?tab-language=c++ [2] 模型文件:https://download.csdn.net/download/crp997576280/12351539 如果大家觉得文章对你有所帮助,麻烦大家帮忙点个赞。O(∩_∩)O 欢迎大家在评论区交流讨论(cenruping@vip.qq.com)


