1.数据格式 在ROS中点云的数据类型 在ROS中表示点云的数据结构有: sensor_msgs::PointCloud sensor_msgs::PointCloud2 pcl::PointCloud< T > 关于PCL在ros的数据的结构,具体的介绍可查 看 wiki.ros.org/pcl/Overview 关于sensor_msgs::PointCloud2 和 pcl::PointCloud 之间的转换使用pcl::fromROSMsg 和 pcl::toROSMsg sensor_msgs::PointCloud 和 sensor_msgs::PointCloud2之间的转换 使用sensor_msgs::convertPointCloud2ToPointCloud 和sensor_msgs::convertPointCloudToPointCloud2. 那么如何在ROS中使用PCL呢? 新建工作空间workspace
mkdir -p ~/catkin_ws/src (catkin_ws修改为你的工作空间的文件名称)
编译工作空间并设置环境变量
$ cd ~/catkin_ws/
$ catkin_make
$ source devel/setup.bash
$ echo $ROS_PACKAGE_PATH
在echo返回的路径中找到当前工作空间的目录即为设置成功。 新建功能包(package)
$ cd ~/catkin_ws/src
$ catkin_create_pkg pcl_VoxelGrid roscpp pcl_ros pcl_conversions sensor_msgs
$ cd ~/catkin_ws
$ catkin_make
$ . ~/catkin_ws/devel/setup.bash
在建立的包下的CMakeLists.txt文件下添加依赖项
 在package.xml文件里添加:
  <build_depend>libpcl-all-dev</build_depend>
  <exec_depend>libpcl-all</exec_depend>
文件完整内容:
<package format="2">
  <name>pcl_VoxelGrid</name>
  <version>0.0.0</version>
  <description>The pcl_VoxelGrid package</description>
  <buildtool_depend>catkin</buildtool_depend>
  <build_depend>pcl_conversions</build_depend>
  <build_depend>pcl_ros</build_depend>
  <build_depend>roscpp</build_depend>
  <build_depend>sensor_msgs</build_depend>
  <build_export_depend>pcl_conversions</build_export_depend>
  <build_export_depend>pcl_ros</build_export_depend>
  <build_export_depend>roscpp</build_export_depend>
  <build_export_depend>sensor_msgs</build_export_depend>
  <build_depend>libpcl-all-dev</build_depend>
  <exec_depend>libpcl-all</exec_depend>
  <exec_depend>pcl_conversions</exec_depend>
  <exec_depend>pcl_ros</exec_depend>
  <exec_depend>roscpp</exec_depend>
  <exec_depend>sensor_msgs</exec_depend>
  <export>
  </export>
</package>
在src文件夹下新建VoxelGrid_filter.cpp文件
#include <ros/ros.h>
// PCL specific includes
#include <sensor_msgs/PointCloud2.h>
#include <pcl_conversions/pcl_conversions.h>
#include <pcl/point_cloud.h>
#include <pcl/point_types.h>

#include <pcl/filters/voxel_grid.h>

ros::Publisher pub;

void cloud_cb (const sensor_msgs::PointCloud2ConstPtr& cloud_msg)
{
  // Container for original & filtered data
  pcl::PCLPointCloud2* cloud = new pcl::PCLPointCloud2;
  pcl::PCLPointCloud2ConstPtr cloudPtr(cloud);
  pcl::PCLPointCloud2 cloud_filtered;

  // Convert to PCL data type
  pcl_conversions::toPCL(*cloud_msg, *cloud);

  // Perform the actual filtering
  pcl::VoxelGrid<pcl::PCLPointCloud2> sor;
  sor.setInputCloud (cloudPtr);
  sor.setLeafSize (0.1, 0.1, 0.1);
  sor.filter (cloud_filtered);

  // Convert to ROS data type
  sensor_msgs::PointCloud2 output;
  pcl_conversions::moveFromPCL(cloud_filtered, output);

  // Publish the data
  pub.publish (output);
}

int
main (int argc, char** argv)
{
  // Initialize ROS
  ros::init (argc, argv, "my_pcl_tutorial");
  ros::NodeHandle nh;

  // Create a ROS subscriber for the input point cloud
  ros::Subscriber sub = nh.subscribe<sensor_msgs::PointCloud2> ("velodyne_points", 1, cloud_cb);

  // Create a ROS publisher for the output point cloud
  pub = nh.advertise<sensor_msgs::PointCloud2> ("filtered_points", 1);

  // Spin
  ros::spin ();
}
在 CMakeLists.txt 文件中添加:
add_executable(example src/example.cpp)
target_link_libraries(example ${catkin_LIBRARIES})
catkin_make之后生成可执行文件,运行以下命令
roslaunch openni_launch openni.launch    这是打开kinect发布的命令
rosrun ros_slam example input:=/camera/depth/points      //运行我们生成的文件
代码的主体内容来源于http://wiki.ros.org/pcl/Tutorials/hydro?action=AttachFile&do=view&target=example_voxelgrid.cpp。对其中的订阅和发布的话题名称作了修改,订阅的/velodyne_points话题来自激光雷达VLP-16发布。 编辑CMakeList.txt文件 在完成源代码编辑后,对CMakeList.txt文件进行修改。 添加两行:
add_executable(VoxelGrid_filter src/VoxelGrid_filter.cpp)
target_link_libraries(VoxelGrid_filter ${catkin_LIBRARIES})
完整的CMakeList.txt文件内容:
cmake_minimum_required(VERSION 2.8.3)
project(pcl_VoxelGrid)

find_package(catkin REQUIRED COMPONENTS
  pcl_conversions
  pcl_ros
  roscpp
  sensor_msgs
)

include_directories(
# include
  ${catkin_INCLUDE_DIRS}
)

add_executable(VoxelGrid_filter src/VoxelGrid_filter.cpp)
target_link_libraries(VoxelGrid_filter ${catkin_LIBRARIES})
编写launch文件 在src文件夹下新建pcl_VoxelGrid.launch文件,添加下面内容:
<launch>
    <node pkg="pcl_VoxelGrid" type="VoxelGrid_filter" name="VoxelGrid_filter" output="screen"/>
</launch>
编译功能包 回到工作空间的根目录利用catkin_make进行编译。 在devel/lib目录下会生成节点的可执行文件:pcl_VoxelGrid_node 在命令下可用roslaunch命令对节点进行启动(先source,不然可能找不到package):
$ source devel/setup.bash
$ roslaunch pcl_VoxelGrid pcl_VoxelGrid.launch
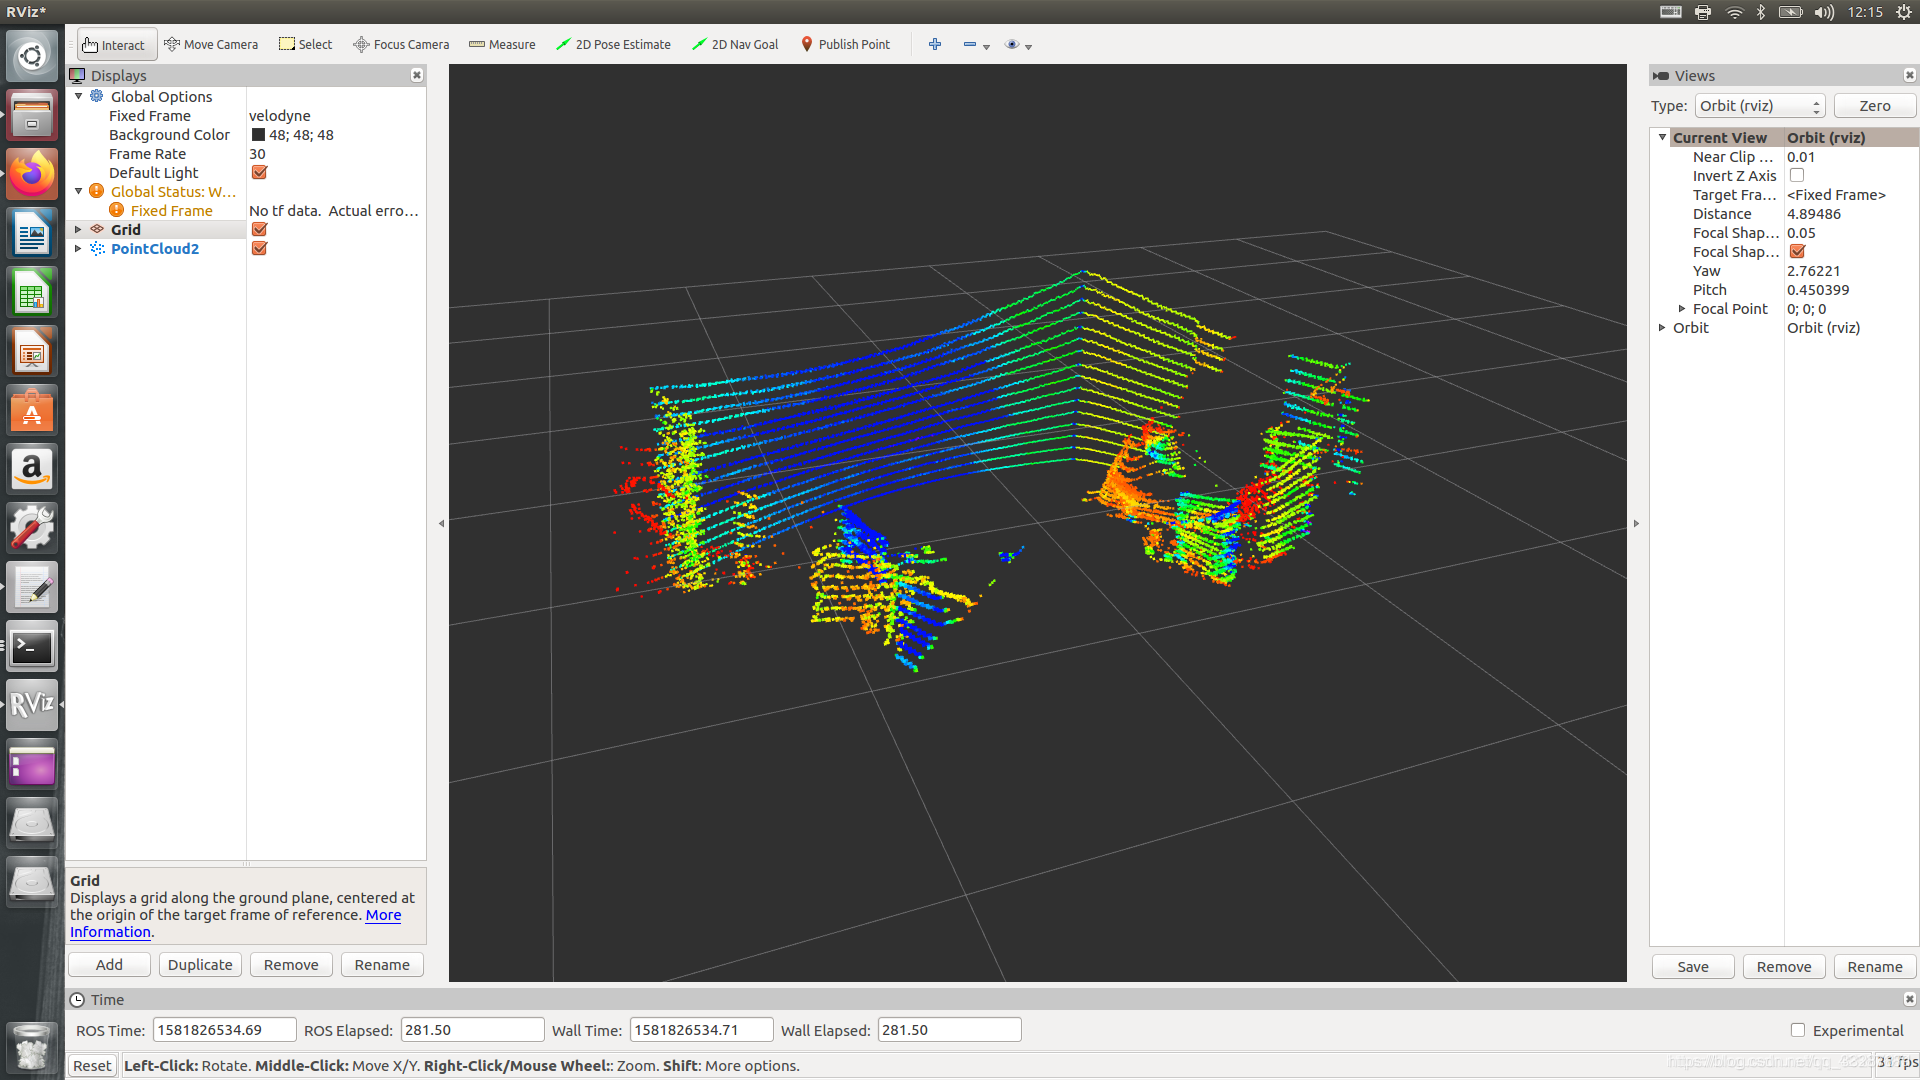
在启动激光雷达工作的情况下,节点工作并会发布/filtered_points的话题,可用rivz工具进行可视化。
rosrun rviz rviz -f velodyne
打开rviz后点击Add,添加by Topic,选择filtered_points话题,可以看到降采样后的点云