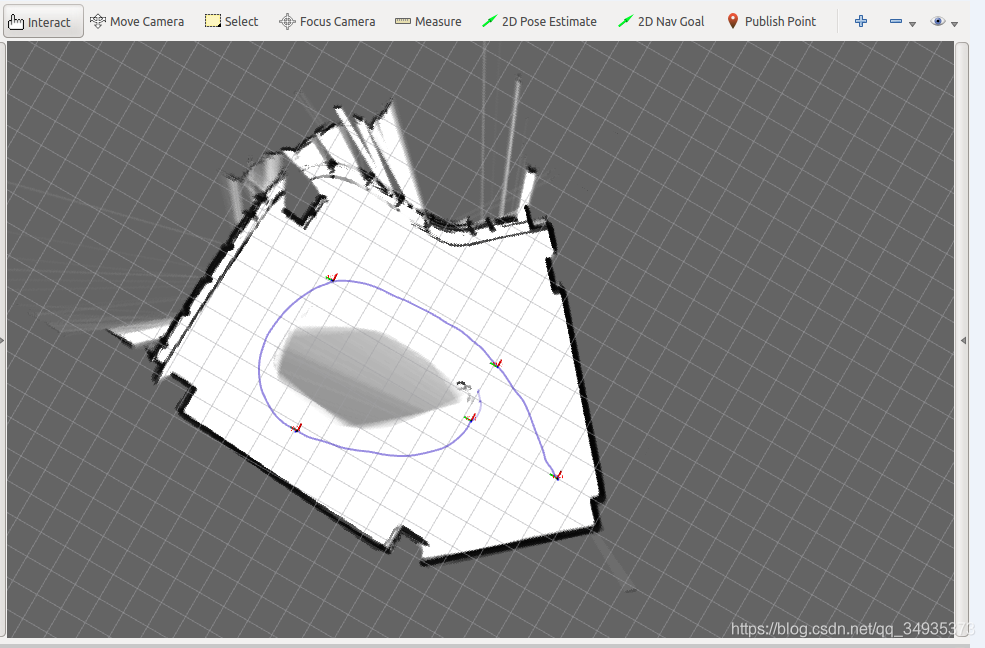
首先,根据不同的雷达,了解雷达发布的点云消息。(IMU也是一样,了解IMU发布的点云topic)。 本文使用的是Robosense 16线激光雷达,暂时未使用IMU(建议6轴,再加上GPS定位精度会高很多)发布PointCloud2类型的消息默认的topic为rslidar_points。 主要步骤分为:配置URDF文件 —》配置.lua文件—》配置launch文件 上述三个文件分别在cartographer的configura_files、urdf、launch文件夹下。 本节描述大概流程,下一节讨论其余细节。
配置URDF文件
意义:为方便后面发布tf转换,主要内容为imu、laser、robot的相对位置关系。
<robot name="my_robot">
  <material name="orange">
    <color rgba="1.0 0.5 0.2 1" />
  </material>
  <material name="gray">
    <color rgba="0.2 0.2 0.2 1" />
  </material>

  <link name="imu">
    <visual>
      <origin xyz="0.0 0.0 0.0" />
      <geometry>
        <box size="0.06 0.04 0.02" />
      </geometry>
      <material name="orange" />
    </visual>
  </link>

  <link name="laser">
    <visual>
      <origin xyz="0.0 0.0 0.0" />
      <geometry>
        <cylinder length="0.07" radius="0.05" />
      </geometry>
      <material name="gray" />
    </visual>
  </link>

  <link name="base_link" />

  <joint name="imu2base" type="fixed">
    <parent link="base_link" />
    <child link="imu" />
    <origin xyz="0 0 0" rpy="0 0 0" />
  </joint>

  <joint name="laser2base" type="fixed">
    <parent link="base_link" />
    <child link="laser" />
    <origin xyz="0. 0.1 0." rpy="0. 0. 0." />
  </joint>

</robot>
大概意思很简单,定义了三个构件link以及两个关节joint,关节处xyz为相对位移,rpy为相对旋转,如果不明白需要自己去学习ros的urdf相关知识。
配置.lua文件
lua文件的参数会在运行时加载到相关变量处,本处使用2D,而且没有其余传感器,如果需要3d或者其他传感器,根据需求修改。改的也很少。可以查看官方文档: https://google-cartographer-ros.readthedocs.io/en/latest/configuration.html
include "map_builder.lua"
include "trajectory_builder.lua"

options = {
  map_builder = MAP_BUILDER,
  trajectory_builder = TRAJECTORY_BUILDER,
  map_frame = "map",  #这个是地图坐标系名称
  tracking_frame = "imu",#设置为IMU的坐标系
  published_frame = "base_link",#设置为机器人坐标系
  odom_frame = "odom",#里程计坐标系名称
  provide_odom_frame = true,
  publish_frame_projected_to_2d = false,
  use_odometry = false,#是否使用编码器提供odom
  use_nav_sat = false,#是否使用gps
  use_landmarks = false,#是否使用路标
  num_laser_scans = 0,
  num_multi_echo_laser_scans = 0,
  num_subdivisions_per_laser_scan = 1,
  num_point_clouds = 1,
  lookup_transform_timeout_sec = 0.2,
  submap_publish_period_sec = 0.3,
  pose_publish_period_sec = 5e-3,
  trajectory_publish_period_sec = 30e-3,
  rangefinder_sampling_ratio = 1.,
  odometry_sampling_ratio = 1.,
  fixed_frame_pose_sampling_ratio = 1.,
  imu_sampling_ratio = 1.,
  landmarks_sampling_ratio = 1.,
}

TRAJECTORY_BUILDER_3D.num_accumulated_range_data = 1

MAP_BUILDER.use_trajectory_builder_3d = true
MAP_BUILDER.num_background_threads = 7
POSE_GRAPH.optimization_problem.huber_scale = 5e2
POSE_GRAPH.optimize_every_n_nodes = 320
POSE_GRAPH.constraint_builder.sampling_ratio = 0.03
POSE_GRAPH.optimization_problem.ceres_solver_options.max_num_iterations = 10
POSE_GRAPH.constraint_builder.min_score = 0.62
POSE_GRAPH.constraint_builder.global_localization_min_score = 0.66

return options
配置launch文件
<launch>
  <param name="/use_sim_time" value="true" />

  <param name="robot_description"
    textfile="$(find cartographer_ros)/urdf/my_demo.urdf" />
  <node name="robot_state_publisher" pkg="robot_state_publisher"
       type="robot_state_publisher"/>

  <node name="rviz" pkg="rviz" type="rviz" required="true"
      args="-d $(find cartographer_ros)/configuration_files/demo_3d.rviz" />

  <node name="cartographer_offline_node" pkg="cartographer_ros"
      type="cartographer_offline_node" args="
          -configuration_directory $(find cartographer_ros)/configuration_files
          -configuration_basenames my_demo.lua
          -urdf_filenames $(find cartographer_ros)/urdf/my_demo.urdf
          -bag_filenames $(arg bag_filenames)"
      output="screen">
    <remap from="points2" to="/rslidar_points" />
    <remap from="imu" to="/imu_raw" />
  </node>

  <node name="cartographer_occupancy_grid_node" pkg="cartographer_ros"
      type="cartographer_occupancy_grid_node" args="-resolution 0.05" />
</launch>
这里是跑离线bag包的lua,我跑在线。第四段不同之处如下,在于启动的节点不同,可以查看我随后的博客,会告诉你不同launch文件开启的不同节点分别有什么用:
 <node name="cartographer_node" pkg="cartographer_ros"
      type="cartographer_offline_node" args="
          -configuration_directory $(find cartographer_ros)/configuration_files
          -configuration_basenames my_demo.lua"
      output="screen">
    <remap from="points2" to="/rslidar_points" />
  </node>
测试效果展示:
当使用cartographer在线建图时,cartographer不知道什么时候结束,所以要先调用服务来关闭传感器数据的接收。这个命令执行完,根据你的建图规模稍微等下,有的场景太大可能后端还没完成,然后你可以在RVIZ看到地图的样子了。
rosservice call /finish_trajectory 0
保存地图
rosservice call /write_state "filename: 'map.pbstream' "
地图保存在目录 ~/.ros(小知识:在文件目录下ctrl+H可以切换隐藏文件夹的显示与否) ls看下目录中是否有生成的map文件,复制出来
cd ~/.ros
cp map.pbstream ../catkin_ws
可以在rviz中看到效果:

转化地图格式:
将pbstream格式转换成为pgm和yaml
roscore
source ioslated_devel/setup.bash
rosrun cartographer_ros cartographer_pbstream_to_ros_map -pbstream_filename map.pbstream
就可以得到ros需要的地图。 参考: 基于Cartographer的3D SLAM(Lidar+IMU)_W_Tortoise的博客-CSDN博客_cartographer3d 定位 https://blog.csdn.net/learning_tortosie/article/details/105158858?utm_medium=distribute.pc_relevant.none-task-blog-BlogCommendFromMachineLearnPai2-3.nonecase&depth_1-utm_source=distribute.pc_relevant.none-task-blog-BlogCommendFromMachineLearnPai2-3.nonecase cartographer 3D运行录制rosbag包 – 达达MFZ – 博客园 https://www.cnblogs.com/mafuqiang/p/10885458.html


