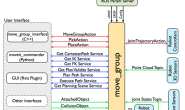
在之前的基础学习中,我们已经对moveit有了一个基本的认识,在实际的应用中,GUI提供的功能毕竟有限,很多实现还是需要我们在代码中完成,moveit的move_group也提供了丰富的C++ API,不仅可以帮助我们使用代码完成GUI可以实现的功能,还可以加入更多丰富的功能。我们继续使用《Mastering ROS for robotics Programming》中的源码作为学习对象。
一、创建功能包
首先,我们先创建一个新的功能包,来放置我们的代码:
$ catkin_create_pkg seven_dof_arm_test catkin cmake_modules interactive_markers moveit_core moveit_ros_perception moveit_ros_planning_interface pluginlib roscpp std_msgs
也可以直接使用《Mastering ROS for robotics Programming》中的seven_dof_arm_test功能包。
二、随机轨迹
通过rviz的planning插件的功能,我们可以为机器人产生一个随机的目标位置,让机器人完成运动规划并移动到目标点。使用代码同样可以实现相同的功能,我们首先从这个较为简单的例程入手,对Moveit C++ API有一个初步的认识。
二话不说,先上代码(源码文件 test_random.cpp可以在源码包中找到):
//首先要包含API的头文件
#include <moveit/move_group_interface/move_group.h>
int main(int argc, char **argv)
{
  ros::init(argc, argv, "move_group_interface_demo", ros::init_options::AnonymousName);
  // 创建一个异步的自旋线程(spinning thread)
  ros::AsyncSpinner spinner(1);
  spinner.start();
  // 连接move_group节点中的机械臂实例组,这里的组名arm是我们之前在setup assistant中设置的
  move_group_interface::MoveGroup group("arm");
  // 随机产生一个目标位置
  group.setRandomTarget();
  // 开始运动规划,并且让机械臂移动到目标位置
  group.move();
  ros::waitForShutdown();
}
已经在代码中加入了重点代码的解释,move_group_interface::MoveGroup用来声明一个机械臂的示例,后边都是针对该实例进行控制。
除了moveit,可能很多人对ROS单节点中的多线程API接触的比较少。一般我们使用的自旋API都是spin()或者spinonce(),但是有些情况下会有问题,比如说我们有两个回调函数,第一个回调函数会延时5秒,那么当我们开始spin()时,回调函数会顺序执行,第二个回调函数会因为第一个回调函数的延时,在5秒之后才开始执行,这个当然是我们无法接受的,所如果采用多线程的spin(),就不会存在这个问题了。关于ROS多线程的问题,可以参考wiki等资料:
http://wiki.ros.org/roscpp/Overview/Callbacks%20and%20Spinning
http://www.cnblogs.com/feixiao5566/p/5288206.html
然后修改CMakeLists文件,编译代码,执行下边的命令:
$ roslaunch seven_dof_arm_config demo.launch
$ rosrun seven_dof_arm_test test_random_node
稍等一下,我们就可以在rviz中看到机械臂的动作了。
三、自定义目标位置并完成规划
接下来我们继续学习如何使用API自定义一个目标位置并让机器人运动过去。源码是 test_custom.cpp,这里我删掉了部分冗余的代码,进行了部分修改:
// 包含miveit的API头文件
#include <moveit/move_group_interface/move_group.h>

int main(int argc, char **argv)
{
  ros::init(argc, argv, "move_group_interface_tutorial");
  ros::NodeHandle node_handle;
  ros::AsyncSpinner spinner(1);
  spinner.start();

  moveit::planning_interface::MoveGroup group("arm");

  // 设置机器人终端的目标位置
  geometry_msgs::Pose target_pose1;
  target_pose1.orientation.w = 0.726282;
  target_pose1.orientation.x= 4.04423e-07;
  target_pose1.orientation.y = -0.687396;
  target_pose1.orientation.z = 4.81813e-07;

  target_pose1.position.x = 0.0261186;
  target_pose1.position.y = 4.50972e-07;
  target_pose1.position.z = 0.573659;
  group.setPoseTarget(target_pose1);


  // 进行运动规划,计算机器人移动到目标的运动轨迹,此时只是计算出轨迹,并不会控制机械臂运动
  moveit::planning_interface::MoveGroup::Plan my_plan;
  bool success = group.plan(my_plan);

  ROS_INFO("Visualizing plan 1 (pose goal) %s",success?"":"FAILED");

  //让机械臂按照规划的轨迹开始运动。
  //if(success)
  //    group.execute(my_plan);

  ros::shutdown();
  return 0;
}
对比生成随机目标的源码,基本上只有只是加入了设置终端目标位置的部分代码,此外这里规划路径使用的是plan(),这个对应rviz中planning的plan按键,只会规划路径,可以在界面中看到规划的路径,但是并不会让机器人开始运动,如果要让机器人运动,需要使用execute(my_plan),对应execute按键。当然,我们也可以使用一个move()来代替paln()和execute()。具体的API说明,可以参考官方的文档:
$ roslaunch seven_dof_arm_config demo.launch
$ rosrun seven_dof_arm_test test_custom_node
四、碰撞检测
moveit可以帮助我们完成机器人的自身碰撞检测和环境障碍物碰撞检测,rivz的GUI中,我们可以通过 Planning Scene插件来导入障碍物并且对障碍物进行编辑,现在我们在前边学习内容的基础上,通过代码加入一个障碍物,看下会对运动规划有什么影响。
// 包含API的头文件
#include <moveit/move_group_interface/move_group.h>
#include <moveit/planning_scene_interface/planning_scene_interface.h>
#include <moveit_msgs/AttachedCollisionObject.h>
#include <moveit_msgs/CollisionObject.h>

int main(int argc, char **argv)
{
    ros::init(argc, argv, "add_collision_objct");
    ros::NodeHandle nh;
    ros::AsyncSpinner spin(1);
    spin.start();

    // 创建运动规划的情景,等待创建完成
    moveit::planning_interface::PlanningSceneInterface current_scene;
    sleep(5.0);

    // 声明一个障碍物的实例,并且为其设置一个id,方便对其进行操作,该实例会发布到当前的情景实例中
    moveit_msgs::CollisionObject cylinder;
    cylinder.id = "seven_dof_arm_cylinder";

    // 设置障碍物的外形、尺寸等属性
    shape_msgs::SolidPrimitive primitive;
    primitive.type = primitive.CYLINDER;
    primitive.dimensions.resize(3);
    primitive.dimensions[0] = 0.6;
    primitive.dimensions[1] = 0.2;

    // 设置障碍物的位置
    geometry_msgs::Pose pose;
    pose.orientation.w = 1.0;
    pose.position.x =  0.0;
    pose.position.y = -0.4;
    pose.position.z =  0.4;

    // 将障碍物的属性、位置加入到障碍物的实例中
    cylinder.primitives.push_back(primitive);
    cylinder.primitive_poses.push_back(pose);
    cylinder.operation = cylinder.ADD;

    // 创建一个障碍物的列表,把之前创建的障碍物实例加入其中
    std::vector<moveit_msgs::CollisionObject> collision_objects;
    collision_objects.push_back(cylinder);

    // 所有障碍物加入列表后(这里只有一个障碍物),再把障碍物加入到当前的情景中,如果要删除障碍物,使用removeCollisionObjects(collision_objects)
    current_scene.addCollisionObjects(collision_objects);

    ros::shutdown();

    return 0;
}
我们再来编译运行一下,看看会发生什么。
$ roslaunch seven_dof_arm_config demo.launch
$ rosrun seven_dof_arm_test add_collision_objct
稍等五秒钟,有没有看到,现在界面中多了一个圆柱体。
在scene objects中可以对障碍物的属性进行再次调整。
障碍物加入之后,再运动机械人的时候,就会检测机器人是否会与障碍物发生碰撞,比如我们用鼠标拖动机器人的终端,让机器人和障碍物发生碰撞:
有没有看到机械臂的部分links变成了红色,这就说明这些links和障碍物发生了碰撞,如果此时进行运动规划,会提示错误的。
上面的代码只是在场景中加入了障碍物,碰撞检测由moveit的插件完成,那么我们如何通过代码来检测是否发生了碰撞呢?可以学习源码包中的 check_collision.cpp:
#include <ros/ros.h>
// 包含moveit的API
#include <moveit/robot_model_loader/robot_model_loader.h>
#include <moveit/planning_scene/planning_scene.h>
#include <moveit/kinematic_constraints/utils.h>
#include <eigen_conversions/eigen_msg.h>

int main(int argc, char **argv)
{
  ros::init (argc, argv, "arm_kinematics");
  ros::AsyncSpinner spinner(1);
  spinner.start();

  // 加载机器人的运动学模型到情景实例中
  robot_model_loader::RobotModelLoader robot_model_loader("robot_description");
  robot_model::RobotModelPtr kinematic_model = robot_model_loader.getModel();
  planning_scene::PlanningScene planning_scene(kinematic_model);

  // 自身碰撞检测
  // 首先需要创建一个碰撞检测的请求对象和响应对象,然后调用碰撞检测的API checkSelfCollision,检测结果会放到collision_result中
  collision_detection::CollisionRequest collision_request;
  collision_detection::CollisionResult collision_result;
  planning_scene.checkSelfCollision(collision_request, collision_result);
  ROS_INFO_STREAM("1. Self collision Test: "<< (collision_result.collision ? "in" : "not in")
                  << " self collision");

  // 修改机器人的状态
  // 我们可以使用场景实例的getCurrentStateNonConst()获取当前机器人的状态,然后修改机器人的状态到一个随机的位置,
  // 清零collision_result的结果后再次检测机器人是否发生滋生碰撞
  robot_state::RobotState& current_state = planning_scene.getCurrentStateNonConst();
  current_state.setToRandomPositions();
  collision_result.clear();
  planning_scene.checkSelfCollision(collision_request, collision_result);
  ROS_INFO_STREAM("2. Self collision Test(Change the state): "<< (collision_result.collision ? "in" : "not in"));

  // 我们也可以指定查询一个group是否和其他部分发生碰撞,只需要在collision_request中修改group_name属性
  collision_request.group_name = "arm";
  current_state.setToRandomPositions();
  collision_result.clear();
  planning_scene.checkSelfCollision(collision_request, collision_result);
  ROS_INFO_STREAM("3. Self collision Test(In a group): "<< (collision_result.collision ? "in" : "not in"));

  // 获取碰撞关系
  // 首先,我们先让机器人发生自身碰撞
  std::vector<double> joint_values;
  const robot_model::JointModelGroup* joint_model_group =
  current_state.getJointModelGroup("arm");
  current_state.copyJointGroupPositions(joint_model_group, joint_values);
  joint_values[2] = 1.57; //原来的代码这里是joint_values[0],并不会导致碰撞,我改成了joint_values[2],在该状态下机器人会发生碰撞
  current_state.setJointGroupPositions(joint_model_group, joint_values);
  ROS_INFO_STREAM("4. Collision points "
                  << (current_state.satisfiesBounds(joint_model_group) ? "valid" : "not valid"));

  // 然后我们再来检测机器人是否发生了自身碰撞,已经发生碰撞的是哪两个部分
  collision_request.contacts = true;
  collision_request.max_contacts = 1000;
  collision_result.clear();
  planning_scene.checkSelfCollision(collision_request, collision_result);
  ROS_INFO_STREAM("5. Self collision Test: "<< (collision_result.collision ? "in" : "not in")
                  << " self collision");

  collision_detection::CollisionResult::ContactMap::const_iterator it;
  for(it = collision_result.contacts.begin();
      it != collision_result.contacts.end();
      ++it)
  {
    ROS_INFO("6 . Contact between: %s and %s",
             it->first.first.c_str(),
             it->first.second.c_str());
  }

  // 修改允许碰撞矩阵(Allowed Collision Matrix,acm)
  // 我们可以通过修改acm来指定机器人是否检测自身碰撞和与障碍物的碰撞,在不检测的状态下,即使发生碰撞,检测结果也会显示未发生碰撞
  collision_detection::AllowedCollisionMatrix acm = planning_scene.getAllowedCollisionMatrix();
  robot_state::RobotState copied_state = planning_scene.getCurrentState();
  collision_detection::CollisionResult::ContactMap::const_iterator it2;
  for(it2 = collision_result.contacts.begin();
      it2 != collision_result.contacts.end();
      ++it2)
  {
    acm.setEntry(it2->first.first, it2->first.second, true);
  }
  collision_result.clear();
  planning_scene.checkSelfCollision(collision_request, collision_result, copied_state, acm);

  ROS_INFO_STREAM("6. Self collision Test after modified ACM: "<< (collision_result.collision ? "in" : "not in")
                  << " self collision");

  // 完整的碰撞检测
  // 同时检测自身碰撞和与障碍物的碰撞
  collision_result.clear();
  planning_scene.checkCollision(collision_request, collision_result, copied_state, acm);

  ROS_INFO_STREAM("6. Full collision Test: "<< (collision_result.collision ? "in" : "not in")
                  << " collision");

  ros::shutdown();
  return 0;
}
编译运行:
$ roslaunch seven_dof_arm_config demo.launch
$ roslaunch seven_dof_arm_test check_collision
可以看到碰撞检测的结果:
更多MoveIt API的使用例程还可以参考下边的链接:
还有MoveIt interface的Class文档:


