作者:zzssdd2
E-mail:zzssdd2@foxmail.com
一、前言
开发环境:Qt5.12.10 + MinGW
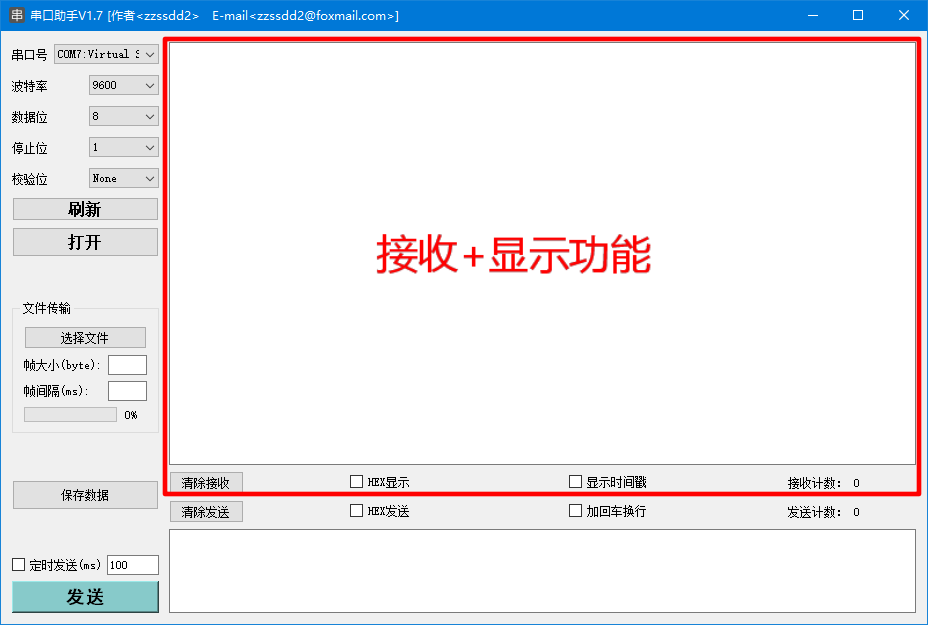
实现的功能
- 串口数据的接收
- ascii字符形式显示与hex字符形式显示
- 时间戳的显示
- 接收数据的统计与显示
- 接收清零
涉及的知识点
QSerialPort类的使用- 数据格式的转换
QTime类的使用- 控件
QTextEdit、QCheckBox、QPushButton、QLabel的使用

二、功能实现
下面开始逐步讲解以上列举的功能实现
2.1、数据读取
在《QT串口助手(二):参数配置》中已经实现了串口参数的配置,参数配置完成后就可以开启串口的数据接收功能了。在QT中的QSerialPort类继承自QIODevice类,所以可以使用QIODevice的readyRead()信号来触发数据的接收,在槽函数中实现数据的读取与处理。信号槽连接如下:
/* 接收数据信号槽 */
connect(serial, &QSerialPort::readyRead, this, &Widget::SerialPortReadyRead_slot);
补充:
[signal]void QIODevice::readyRead()This signal is emitted once every time new data is available for reading from the device’s current read channel. It will only be emitted again once new data is available, such as when a new payload of network data has arrived on your network socket, or when a new block of data has been appended to your device.
readyRead() is not emitted recursively; if you reenter the event loop or call waitForReadyRead() inside a slot connected to the readyRead() signal, the signal will not be reemitted (although waitForReadyRead() may still return true).
Note for developers implementing classes derived from QIODevice: you should always emit readyRead() when new data has arrived (do not emit it only because there’s data still to be read in your buffers). Do not emit readyRead() in other conditions.
当有收到新数据信号时,就会执行槽函数里面的数据读取功能:
/*读取串口收到的数据*/
QByteArray bytedata = serial->readAll();
补充:
QByteArray QIODevice::readAll()
Reads all remaining data from the device, and returns it as a byte array.
This function has no way of reporting errors; returning an empty QByteArray can mean either that no data was currently available for reading, or that an error occurred.
2.2、数据转换
若需要将接收到的数据以HEX格式显示,则需要对接收到的数据进行以下处理:
/*将数据转换为hex格式并以空格分隔->去掉头尾空白字符->转换为大写形式*/
framedata = bytedata.toHex(' ').trimmed().toUpper();
补充:
QByteArray QByteArray::toHex(char separator) const
This is an overloaded function.
Returns a hex encoded copy of the byte array. The hex encoding uses the numbers 0-9 and the letters a-f.
If separator is not ‘\0’, the separator character is inserted between the hex bytes.
Example:
QByteArray macAddress = QByteArray::fromHex("123456abcdef");
macAddress.toHex(':'); // returns "12:34:56:ab:cd:ef"
macAddress.toHex(0);   // returns "123456abcdef"
This function was introduced in Qt 5.9.
QByteArray QByteArray::trimmed() const
Returns a byte array that has whitespace removed from the start and the end.
Whitespace means any character for which the standard C++
isspace()function returnstruein the C locale. This includes the ASCII characters ‘\t’, ‘\n’, ‘\v’, ‘\f’, ‘\r’, and ‘ ‘.Example:
QByteArray ba("  lots\t of\nwhitespace\r\n ");
ba = ba.trimmed();
// ba == "lots\t of\nwhitespace";
Unlike simplified(), trimmed() leaves internal whitespace alone.
QByteArray QByteArray::toUpper() const
Returns an uppercase copy of the byte array. The bytearray is interpreted as a Latin-1 encoded string.
Example:
QByteArray x("Qt by THE QT COMPANY");
QByteArray y = x.toUpper();
// y == "QT BY THE QT COMPANY"
2.3、添加时间戳
有时为了便于观察数据收发时间,需要在数据前插入时间戳显示。使用QTime类中的方法可以获取当前系统的时间(精确到ms),对数据处理如下:
/*在数据前插入时间戳:[时:分:秒:毫秒]:RX -> 数据*/
framedata = QString("[%1]:RX -> %2").arg(QTime::currentTime().toString("HH:mm:ss:zzz")).arg(framedata);
补充:
[static]QTime QTime::currentTime()Returns the current time as reported by the system clock.
Note that the accuracy depends on the accuracy of the underlying operating system; not all systems provide 1-millisecond accuracy.
Furthermore, currentTime() only increases within each day; it shall drop by 24 hours each time midnight passes; and, beside this, changes in it may not correspond to elapsed time, if a daylight-saving transition intervenes.
2.4、接收计数
使用一个quint32类型数据对每次接收数据长度进行累加,记录接收数据总数,然后将数据更新到ui界面:
dataTotalRx += bytedata.length();
ui->RxCnt_label->setText(QString::number(dataTotalRx));
2.5、数据显示
以上功能完成后将数据显示到接收框中(为了区分不同显示格式,做了不同的颜色显示)。完整的数据接收功能展示如下:
/*
    函   数:SerialPortReadyRead_slot
    描   述:readyRead()信号对应的数据接收槽函数
    输   入:无
    输   出:无
*/
void Widget::SerialPortReadyRead_slot()
{
    QString framedata;
    /*读取串口收到的数据*/
    QByteArray bytedata = serial->readAll();

    /*数据是否为空*/
    if (!bytedata.isEmpty())
    {
        if(ui->HexDisp_checkBox->isChecked())
        {
            /*hex显示*/
            framedata = bytedata.toHex(' ').trimmed().toUpper();
            ui->Receive_TextEdit->setTextColor(QColor(Qt::green));
        }
        else
        {
            /*ascii显示*/
            framedata = QString(bytedata);
            ui->Receive_TextEdit->setTextColor(QColor(Qt::magenta));
        }

        /*是否显示时间戳*/
        if (ui->TimeDisp_checkBox->isChecked())
        {
            framedata = QString("[%1]:RX -> %2").arg(QTime::currentTime().toString("HH:mm:ss:zzz")).arg(framedata);
            ui->Receive_TextEdit->append(framedata);
        }
        else
        {
            ui->Receive_TextEdit->insertPlainText(framedata);
        }

        /*更新接收计数*/
        dataTotalRxCnt += bytedata.length();
        ui->RxCnt_label->setText(QString::number(dataTotalRxCnt));
    }
}
演示效果如下:

补充:
QColor::QColor(Qt::GlobalColor color)
This is an overloaded function.
Constructs a new color with a color value of color.
enum Qt::GlobalColor
Qt’s predefined QColor objects:
Constant Value Description Qt::white3White (#ffffff) Qt::black2Black (#000000) Qt::red7Red (#ff0000) Qt::darkRed13Dark red (#800000) Qt::green8Green (#00ff00) Qt::darkGreen14Dark green (#008000) Qt::blue9Blue (#0000ff) Qt::darkBlue15Dark blue (#000080) Qt::cyan10Cyan (#00ffff) Qt::darkCyan16Dark cyan (#008080) Qt::magenta11Magenta (#ff00ff) Qt::darkMagenta17Dark magenta (#800080) Qt::yellow12Yellow (#ffff00) Qt::darkYellow18Dark yellow (#808000) Qt::gray5Gray (#a0a0a4) Qt::darkGray4Dark gray (#808080) Qt::lightGray6Light gray (#c0c0c0) Qt::transparent19a transparent black value (i.e., QColor(0, 0, 0, 0)) Qt::color000 pixel value (for bitmaps) Qt::color111 pixel value (for bitmaps)
2.6、清除接收
当清除接收按键点击后,会清除接收框显示的内容以及接收计数。使用QPushButton的点击信号槽实现如下:
/*
    函   数:on_ClearRx_Bt_clicked
    描   述:清除接收按键点击信号对应的槽函数
    输   入:无
    输   出:无
*/
void Widget::on_ClearRx_Bt_clicked()
{
    ui->Receive_TextEdit->clear();
    ui->RxCnt_label->setText(QString::number(0));
    dataTotalRxCnt = 0;
}
三、总结
本篇文章主要是讲述如何对串口数据进行接收和显示。除了上面列出的主要功能外,还需要了解各个控件的操作方法,比如QTextEdit文本的添加、QLabel文本的设置等。还有就是QT中基本的数据类型的数据使用,比如QString、QBytArray等。


