概述
Okio 作为 Okhttp 底层 io 库,它补充了 java.io 和 java.nio 的不足,使访问、存储和处理数据更加容易。Okio 的特点如下:
-
okio 是一个由 square 公司开发的开源库,它弥补了 Java.io 和 java.nio 的不足,能够更方便快速的读取、存储和处理数据。
-
okio 有自己的流类型 Source 和 Sink,对应于 java.io 的 InputStream 和 OutputStream。
-
okio 内部引入了 ByteString 和 Buffer,提升了效率和性能。
-
okio 引入了超时机制。
- okio 规模不大,代码精巧,是源码学习的好素材
强烈建议大家阅读 okio 的文档说明:https://square.github.io/okio/ 。本文代码介绍基于版本 1.17.4。
流(Stream)
是指在计算机的输入输出操作中各部件之间的数据流动。按照数据的传输方向,流可分为输入流与输出流。Java语言里的流序列中的数据既可以是未经加工的原始二进制数据,也可以是经过一定编码处理后符合某种特定格式的数据。
1.输入输出流
在Java中,把不同类型的输入输出源抽象为流,其中输入和输出的数据称为数据流(Data Stream)。数据流是Java程序发送和接收数据的一个通道,数据流中包括输入流(Input Stream)和输出流(Output Stream)。通常应用程序中使用输入流读出数据,输出流写入数据。 流式输入、输出的特点是数据的获取和发送均沿数据序列顺序进行。相对于程序来说,输出流是往存储介质或数据通道写入数据,而输入流是从存储介质或数据通道中读取数据,一般来说关于流的特性有下面几点:
-
先进先出,最先写入输出流的数据最先被输入流读取到。
-
顺序存取,可以一个接一个地往流中写入一串字节,读出时也将按写入顺序读取一串字节,不能随机访问中间的数据。
-
只读或只写,每个流只能是输入流或输出流的一种,不能同时具备两个功能,在一个数据传输通道中,如果既要写入数据,又要读取数据,则要分别提供两个流。
2.缓冲流
为了提高数据的传输效率,引入了缓冲流(Buffered Stream)的概念,即为一个流配备一个缓冲区(Buffer),一个缓冲区就是专门用于传送数据的一块内存。
当向一个缓冲流写入数据时,系统将数据发送到缓冲区,而不是直接发送到外部设备。缓冲区自动记录数据,当缓冲区满时,系统将数据全部发送到相应的外部设备。当从一个缓冲流中读取数据时,系统实际是从缓冲区中读取数据,当缓冲区为空时,系统就会从相关外部设备自动读取数据,并读取尽可能多的数据填满缓冲区。 使用数据流来处理输入输出的目的是使程序的输入输出操作独立于相关设备,由于程序不需关注具体设备实现的细节(具体细节由系统处理),所以对于各种输入输出设备,只要针对流做处理即可,不需修改源程序,从而增强了程序的可移植性。
Okio 关键类介绍
ByteStrings and Buffers
Okio 是围绕这两种类型构建的,它们将大量功能打包到一个简单的 API 中:
ByteString是不可变的字节序列。对于字符数据,最基本的就是String。而ByteString就像是String的兄弟一般,它使得将二进制数据作为一个变量值变得容易。这个类很聪明:它知道如何将自己编码和解码为十六进制、base64 和 utf-8。
Buffer是一个可变的字节序列。像 Arraylist 一样,你不需要预先设置缓冲区的大小。你可以将缓冲区读写为一个队列:将数据写到队尾,然后从队头读取。在内部,
ByteString和Buffer做了一些聪明的事情来节省CPU和内存。如果您将UTF-8字符串编码为ByteString,它会缓存对该字符串的引用,这样,如果您稍后对其进行解码,就不需要做任何工作。
Buffer是作为片段的链表实现的。当您将数据从一个缓冲区移动到另一个缓冲区时,它会重新分配片段的持有关系,而不是跨片段复制数据。这对多线程特别有用:与网络交互的子线程可以与工作线程交换数据,而无需任何复制或多余的操作。
Sources and Sinks
java.io设计的一个优雅部分是如何对流进行分层来处理加密和压缩等转换。Okio 有自己的 stream 类型:Source和Sink,分别类似于 java 的Inputstream和Outputstream,但是有一些关键区别:
超时(Timeouts)。流提供了对底层 I/O 超时机制的访问。与
java.io的 socket 字流不同,read()和write()方法都给予超时机制。易于实施。
source只声明了三个方法:read()、close()和timeout()。没有像available()或单字节读取这样会导致正确性和性能意外的危险操作。使用方便。虽然
source和sink的实现只有三种方法可写,但是调用方可以实现Bufferedsource和Bufferedsink接口, 这两个接口提供了丰富API能够满足你所需的一切。字节流和字符流之间没有人为的区别。都是数据。你可以以字节、UTF-8 字符串、big-endian 的32位整数、little-endian 的短整数等任何你想要的形式进行读写;不再有
InputStreamReader!易于测试。
Buffer类同时实现了BufferedSource和BufferedSink接口,即是 source 也是 sink,因此测试代码简单明了。Sources 和 Sinks 分别与
InputStream和OutputStream交互操作。你可以将任何Source看做InputStream,也可以将任何InputStream当做Source。对于Sink和Outputstream也是如此。
Segment
Segment在 Okio 中作为数据缓冲的载体,一个 Segment 的数据缓冲大小为 8192,即 8k。每一个 Segment 都有前驱和后继结点,也就是说 Sement 是一个双向链表链表,准确的来说是一个双向循环链表。读取数据从 Segment 头结点读取,写数据从 Segment 尾结点写。
Okio 中引入池的概念也就是源码中SegmentPool的实现。SegmentPool 负责 Segment 创建和销毁,SegmentPool 最大可以缓存 8 个 Segment。
SegmentPool 是一个静态方法,因此也就是全局缓存只有 64 kb;
整体设计
前面说了介绍了很多关键的类,下面看下 Okio 的整体设计:
 图片摘自 Okio源码分析 通过类图来看,整体设计是很简单明了的,可以结合前面介绍的关键类,这样你会更加理解这个设计图。
Okio 读写流程
在介绍 Okio 的读写流程的时候,还是得提一下一个关键的类:Okio。
Okio 类是工具类,内部提供了很多静态方法,方便大家调用,减少大家写了很多重复的代码,使得整个调用变得更加简单。

读文本文件
 public void readLines(File file) throws IOException {
      Source fileSource = Okio.source(file);
      BufferedSource bufferedSource = Okio.buffer(fileSource);
      for (String line; (line = bufferedSource.readUtf8Line()) != null; ) {
          System.out.println(line);
      }
      bufferedSource.close();
  }
这个示例代码是用来读取文本文件的,Okio 通过 Okio.source(File) 的方式来读取文件流,它返回的是一个 Source 对象,但是 Source 对象的方法是比较少的(只有3个),因此 Okio 提供了一个装饰者对象接口 BufferedSource,通过 Okio.buffer(fileSource) 来生成,这个方法内部实际会生成一个 RealBufferedSource 类对象,RealBufferedSource 内部持有Buffer缓冲对象可使 IO 速度更快,该类实现了BufferedSource接口,而 BufferedSource 接口提供了大量丰富的接口方法:


可以看到,几乎你想从输入流中读取任何的数据类型都可以,而不需要你自己去转换,可以说是非常强大而且人性化了,除了 read 方法以外,还有一些别的方法,可以说几乎可以满足很多需求。
在上面的示例代码中,打开输入流对象的方法需要负责关闭对象资源,调用 close 方法,Okio 官方推荐使用 java 的 try-with-source 语法,上面示例代码可以写成下面这样:
public void readLines(File file) throws IOException {
      try (BufferedSource bufferedSource = Okio.buffer(Okio.source(file))) {
           for (String line; (line = bufferedSource.readUtf8Line()) != null; ) {
              System.out.println(line);
           }
      }
  }
try-with-source 是 jdk1.4 开始提供的语法糖,在 try 语句 () 里面的资源对象,jdk 最终会自动调用它的 close 方法去关闭它, 即便 try 里有多个资源对象也是可以的,这样就不用你手动去关闭资源了。但是在 android 里面使用的话,会提示你要求 API level 最低为 19 才可以。
写文本文件
public void writeEnv(File file) throws IOException {
  try (BufferedSink sink = Okio.buffer(Okio.sink(file))) {
       sink.writeUtf8("啊啊啊")
             .writeUtf8("=")
          .writeUtf8("aaa")
          .writeUtf8("\n");
  }
}
其中 Okio.buffer(fileSink) 内部返回的实现对象是一个 RealBufferedSink 类的对象, 跟 RealBufferedSource一 样它也是一个装饰者对象,具备 Buffer 缓冲功能。
类似于读文件使用 Source 和 BufferedSource, 写文件的话,则是使用的 Sink 和 BufferedSink,同样的在 BufferedSink 接口中也提供了丰富的接口方法,这里就不展开了,具体可以查看代码。
此处再次强烈建议去阅读官方文档:https://square.github.io/okio/ 。
源码分析
通过上面的介绍,大家对 Okio 的读取有了一个基本的了解。下面开始进入源码分析,深入去研究其实现,再介绍源码的时候,会先对一些接口做一些简单的介绍。
Source & Sink
public interface Sink extends Closeable, Flushable {
  /** Removes {@code byteCount} bytes from {@code source} and appends them to this. */  从 source 中获取到的数据添加到 sink 自身
  void write(Buffer source, long byteCount) throws IOException;

  /** Pushes all buffered bytes to their final destination. */
  @Override void flush() throws IOException;

  /** Returns the timeout for this sink. */
  Timeout timeout();

  @Override void close() throws IOException;
}

public interface Source extends Closeable {
  /**
   * Removes at least 1, and up to {@code byteCount} bytes from this and appends
   * them to {@code sink}. Returns the number of bytes read, or -1 if this
   * source is exhausted.  将自身数据给 sink
   */
  long read(Buffer sink, long byteCount) throws IOException;

  /** Returns the timeout for this source. */
  Timeout timeout();

   */
  @Override void close() throws IOException;
}
这两个是 Okio 中最基本的两个接口,分别对应 java 的 InputStream 和 OutputStream 即输入流和输出流,Source 是输入流,Sink 是输出流。接口提供的方法也是非常简单,大家一看就知道这几个方法的目的。
BufferedSink & BufferedSource
上面 Source和 Sink 提供了极简的接口,接着作者对这两个接口进行丰富的扩展。具体接口方法上文已介绍,这里也不在展开。
这里简单提一点,这种设计风格是值得我们去学习的,设计接口的时候要简单,专一。然后可以再新建一个接口,去丰富扩展其功能。这样使用者可以选择自己想要的接口来进行实现。
RealBufferedSource & RealBufferedSink
在我们通过 Okio.source() 和 Okio.sink() 获取了 Souce 和 Sink 对象后,一般不会直接使用,而是会再调用一次 Okio.buffer() 生成一个实现 BufferedSource 和 BufferedSink 接口的对象:
  /**
   * Returns a new source that buffers reads from {@code source}. The returned
   * source will perform bulk reads into its in-memory buffer. Use this wherever
   * you read a source to get an ergonomic and efficient access to data.
   */
  public static BufferedSource buffer(Source source) {
    return new RealBufferedSource(source);
  }

  /**
   * Returns a new sink that buffers writes to {@code sink}. The returned sink
   * will batch writes to {@code sink}. Use this wherever you write to a sink to
   * get an ergonomic and efficient access to data.
   */
  public static BufferedSink buffer(Sink sink) {
    return new RealBufferedSink(sink);
  }
内部分别返回的是 RealBufferedSource 和 RealBufferedSink 对象,他们分别实现了 BufferedSource 和BufferedSink接口,而这两个接口则是分别继承了 Source 和 Sink 接口的并基础上进行了方法扩展,提供了丰富的读写接口方法,几乎可以对各种基础数据类型进行读写。
Segment 及 SegmentPool
Segment 是 Okio 中非常重要的一环,它可以说是 Buffer 中数据的载体。容量是 8kb,头结点为 head。
final class Segment {
  //Segment的容量,最大为8kb
  static final int SIZE = 8192;

  //如果Segment中字节数 > SHARE_MINIMUM时(大Segment),就可以共享,不能添加到SegmentPool
  static final int SHARE_MINIMUM = 1024;
  //存储的数据
  final byte[] data;

  //下一次读取的开始位置
  int pos;

 //写入的开始位置
  int limit;

  //当前Segment是否可以共享
  boolean shared;

  //data是否仅当前Segment独有,不share
  boolean owner;

  //后继节点
  Segment next;

  //前驱节点
  Segment prev;

  ...

  //移除当前Segment
  public final @Nullable Segment pop() {
    Segment result = next != this ? next : null;
    prev.next = next;
    next.prev = prev;
    next = null;
    prev = null;
    return result;
  }

  //在当前节点后添加一个新的节点
  public final Segment push(Segment segment) {
    segment.prev = this;
    segment.next = next;
    next.prev = segment;
    next = segment;
    return segment;
  }

  //将当前Segment分裂成2个Segment结点。前面结点pos~limit数据范围是[pos..pos+byteCount),后面结点pos~limit数据范围是[pos+byteCount..limit)
  public final Segment split(int byteCount) {
    if (byteCount <= 0 || byteCount > limit - pos) throw new IllegalArgumentException();
    Segment prefix;

    //如果字节数大于SHARE_MINIMUM则拆分成共享节点
    if (byteCount >= SHARE_MINIMUM) {
      prefix = sharedCopy();
    } else {
      prefix = SegmentPool.take();
      System.arraycopy(data, pos, prefix.data, 0, byteCount);
    }

    prefix.limit = prefix.pos + byteCount;
    pos += byteCount;
    prev.push(prefix);
    return prefix;
  }

  //当前Segment结点和prev前驱结点合并成一个Segment,统一合并到prev,然后当前Segment结点从双向链表移除并添加到SegmentPool复用。当然合并的前提是:2个Segment的字节总和不超过8K。合并后可能会移动pos、limit
  public final void compact() {
    if (prev == this) throw new IllegalStateException();
    if (!prev.owner) return; // Cannot compact: prev isn't writable.
    int byteCount = limit - pos;
    int availableByteCount = SIZE - prev.limit + (prev.shared ? 0 : prev.pos);
    if (byteCount > availableByteCount) return; // Cannot compact: not enough writable space.
    writeTo(prev, byteCount);
    pop();
    SegmentPool.recycle(this);
  }

  //从当前节点移动byteCount个字节到sink中
  public final void writeTo(Segment sink, int byteCount) {
    if (!sink.owner) throw new IllegalArgumentException();
    if (sink.limit + byteCount > SIZE) {
      // We can't fit byteCount bytes at the sink's current position. Shift sink first.
      if (sink.shared) throw new IllegalArgumentException();
      if (sink.limit + byteCount - sink.pos > SIZE) throw new IllegalArgumentException();
      System.arraycopy(sink.data, sink.pos, sink.data, 0, sink.limit - sink.pos);
      sink.limit -= sink.pos;
      sink.pos = 0;
    }

    System.arraycopy(data, pos, sink.data, sink.limit, byteCount);
    sink.limit += byteCount;
    pos += byteCount;
  }
}
SegmentPool 是一个 Segment 池,内部维护了一个 Segment 单向链表,容量为64kb(8 个 Segment),回收不用的 Segment 对象。
final class SegmentPool {
    //SegmentPool的最大容量
    static final long MAX_SIZE = 64 * 1024; // 64 KiB.

    //后继节点
    static Segment next;

    //当前池内的总字节数
    static long byteCount;

    private SegmentPool() {
    }
    //从池中获取一个Segment对象
    static Segment take() {
        synchronized (SegmentPool.class) {
            if (next != null) {
                Segment result = next;
                next = result.next;
                result.next = null;
                byteCount -= Segment.SIZE;
                return result;
            }
        }
        return new Segment(); // Pool is empty. Don't zero-fill while holding a lock.
    }
    //将Segment状态初始化并放入池中
    static void recycle(Segment segment) {
        if (segment.next != null || segment.prev != null) throw new IllegalArgumentException();
        if (segment.shared) return; // This segment cannot be recycled.
        synchronized (SegmentPool.class) {
            if (byteCount + Segment.SIZE > MAX_SIZE) return; // Pool is full.
            byteCount += Segment.SIZE;
            segment.next = next;
            segment.pos = segment.limit = 0;
            next = segment;
        }
    }
}
SegmentPool 可以理解为一个缓存Segment的池,它只有两个方法,一个 take(),一个 recycle(),在 SegmentPool 中维护的是一个 Segment 的单链表,并且它的最大值为 MAX_SIZE = 64 * 1024 也就是 64kb 即 8 个 Segment 的长度,next 就是单链表中的头结点。
take() 方法的作用是取出单链表的头结点 Segment 对象,然后将取出的对象与链表断开并将链表往后移动一个单位,如果是第一次调用 take, next 为 null, 则会直接 new 一个 Segment 对象返回,并且这里创建的Segment是不共享的。
recycle() 方法的作用则是回收一个 Segment 对象,被回收的 Segment 对象将会被插入到 SegmentPool 中的单链表的头部,以便后面继续复用,并且这里源码我们也可以看到如果是 shared 的对象是不处理的,如果是第一次调用 recycle() 方法则链表会由空变为拥有一个节点的链表, 每次回收就会插入一个到表头,直到超过最大容量。
Buffer
如果你只看 Segment 的话还是很难理解整个数据的读写流程,因为你只知道它是能够形成一个链表的东西,但是当你看完 Buffer 之后完整的流程就会清晰多了。
Buffer 类是 Okio 中最核心并且最丰富的类了,前面分析发现最终的 Source 和 Sink 实现对象中,都是通过该类完成读写操作,而 Buffer 类同时实现了 BufferedSource 和 BufferedSink 接口,因此 Buffer 具备 Okio 中的读和写的所有方法,所以这个类的方法超多!我们只找一个读和写的方法来看一下实现好了。
写byte[]操作:
    @Override
    public Buffer write(byte[] source, int offset, int byteCount) {
        if (source == null) throw new IllegalArgumentException("source == null");
        // 检测参数的合法性
        checkOffsetAndCount(source.length, offset, byteCount);

        // 计算 source 要写入的最后一个字节的 index 值
        int limit = offset + byteCount;
        while (offset < limit) {
            // 获取循环链表尾部的一个 Segment
            Segment tail = writableSegment(1);
            // 计算最多可写入的字节
            int toCopy = Math.min(limit - offset, Segment.SIZE - tail.limit);
            // 把 source 复制到 data 中
            System.arraycopy(source, offset, tail.data, tail.limit, toCopy);
            // 调整写入的起始位置
            offset += toCopy;
            // 调整尾部Segment 的 limit 位置
            tail.limit += toCopy;
        }
        // 调整 Buffer 的 size 大小
        size += byteCount;
        return this;
    }
写操作内部是调用 System.arraycopy 进行字节数组的复制,这里是写到 tail 对象,也就是循环链表的链尾 Segment 对象当中,而且这里会不断循环的获取链尾 Segment 对象进行写入。
看一下获取链尾的方法:
  /**
   * Returns a tail segment that we can write at least {@code minimumCapacity}
   * bytes to, creating it if necessary.
   */
  Segment writableSegment(int minimumCapacity) {
    if (minimumCapacity < 1 || minimumCapacity > Segment.SIZE) throw new IllegalArgumentException();

    // 如果链表的头指针为null,就会SegmentPool中取出一个
    if (head == null) {
      head = SegmentPool.take(); // Acquire a first segment.
      return head.next = head.prev = head;
    }

    // 获取前驱结点,也就是尾部结点
    Segment tail = head.prev;
    // 如果能写的字节数限制超过了8192,或者不是拥有者
    if (tail.limit + minimumCapacity > Segment.SIZE || !tail.owner) {
        // 从SegmentPool中获取一个Segment,插入到循环双链表当前结点的后面
      tail = tail.push(SegmentPool.take()); // Append a new empty segment to fill up.
    }
    return tail;
  }
这里有个 head 对象,就是 Segment 链表的头结点的引用,这个方法中可以看到如果写的时候头结点head为空,则会调用 SegmentPool.take() 方法从Segment池中获取一个 Segment缓存对象,并以此形成一个双向链表的初始节点:
    if (head == null) {
      head = SegmentPool.take(); // Acquire a first segment.
      return head.next = head.prev = head;
    }
这时Segment中会形成下面这样的初始链表: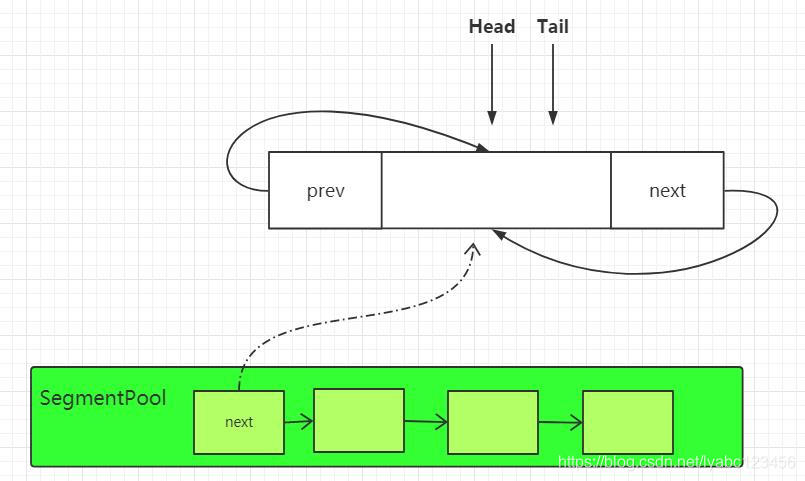
这时头结点和尾节点其实是同一个节点,然后取得 head.prev 也就是 tail 尾节点返回,但是如果此时 tail 能写的字节数限制超过了 8k 或者尾节点不是 data 的拥有者,就会调用tail.push(SegmentPool.take()); 也就是再调用一次 SegmentPool.take() 取到 Segment 池中下一个 Segment. 通过 tail. push() 方法插入到循环链表的尾部。这时 Segment 中的链表会变成下面这样: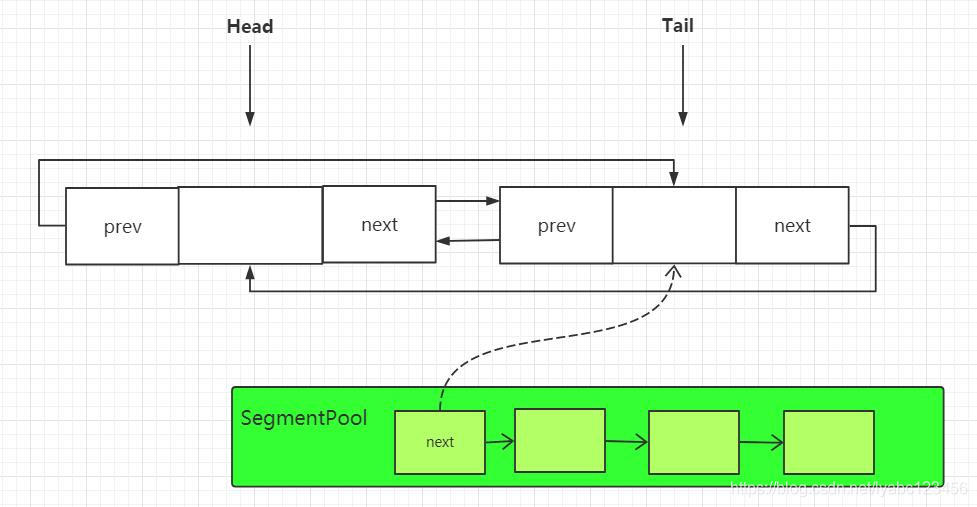
此时插入的节点会作为新的tail节点返回,下一次获取尾节点的时候就会取到它,每当 tail 进行 push 一次,就会将新 push 的节点作为新的尾节点:

读byte[]操作:
  @Override
  public int read(byte[] sink, int offset, int byteCount) {
    checkOffsetAndCount(sink.length, offset, byteCount);
    //取到Segment循环链表的表头
    Segment s = head;
    if (s == null) return -1;
    // 计算最多可写入的字节
    int toCopy = Math.min(byteCount, s.limit - s.pos);
    //将数据拷贝到链头的data字节数组当中
    System.arraycopy(s.data, s.pos, sink, offset, toCopy);

    //调整链头的data数组的起始postion和Buffer的size
    s.pos += toCopy;
    size -= toCopy;
    //pos等于limit的时候,从循环链表中移除该Segment并从SegmentPool中回收复用
    if (s.pos == s.limit) {
      head = s.pop();//移除的同时返回下一个Segment作为表头
      SegmentPool.recycle(s);
    }

    return toCopy;
  }
读操作内部也是调用 System.arraycopy 进行字节数组的复制,这里是直接对 head 头结点进行读取,也就是说 Buffer 在每次读数据的时候都是从链表的头部进行读取的,如果读取的头结点的 pos 等于 limit, 这里就会调用 s.pop() 将头节点从链表中删除,并返回下一个节点作为新的头结点引用,然后将删除的节点通过 SegmentPool.recycle(s) 进行回收复用。这时链表中的变化如下: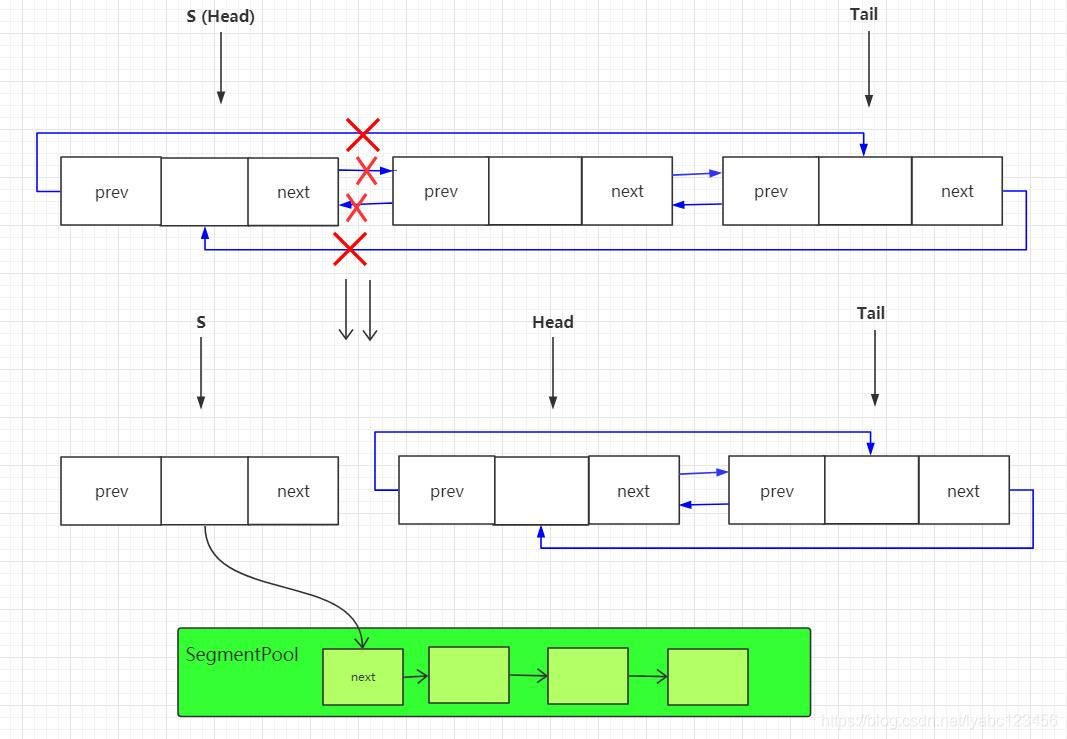
以上是读写字节数据的过程,读取其它数据类型如 int、long、String,过程类似,所以简单的概括 Buffer 中读的过程就是不断取头结点的过程,而写的过程就是不断取尾节点的过程。
Buffer 除了读写基础数据以外,还有一个比较重要的功能就是 Buffer 之间的数据交换, 还记得在官方对 Buffer 的介绍中写到的:
当您将数据从一个缓冲区移动到另一个缓冲区时,它会重新分配片段的持有关系,而不是跨片段复制数据。这对多线程特别有用:与网络交互的子线程可以与工作线程交换数据,而无需任何复制或多余的操作。
这里说在 Buffer 缓冲区之间移动数据的时候,是重新分配片段也就是 Segment 的持有关系,而不是跨片段的复制数据,那么它说的这个比较牛逼的过程是如何实现的呢, 来看一下实现的方法:
@Override
public void write(Buffer source, long byteCount) {
    // Move bytes from the head of the source buffer to the tail of this buffer
    // while balancing two conflicting goals: don't waste CPU and don't waste
    // memory.
    //
    //
    // Don't waste CPU (ie. don't copy data around).
    //
    // Copying large amounts of data is expensive. Instead, we prefer to
    // reassign entire segments from one buffer to the other.
    //
    //
    // Don't waste memory.
    //
    // As an invariant, adjacent pairs of segments in a buffer should be at
    // least 50% full, except for the head segment and the tail segment.
    //
    // The head segment cannot maintain the invariant because the application is
    // consuming bytes from this segment, decreasing its level.
    //
    // The tail segment cannot maintain the invariant because the application is
    // producing bytes, which may require new nearly-empty tail segments to be
    // appended.
    //
    //
    // Moving segments between buffers
    //
    // When writing one buffer to another, we prefer to reassign entire segments
    // over copying bytes into their most compact form. Suppose we have a buffer
    // with these segment levels [91%, 61%]. If we append a buffer with a
    // single [72%] segment, that yields [91%, 61%, 72%]. No bytes are copied.
    //
    // Or suppose we have a buffer with these segment levels: [100%, 2%], and we
    // want to append it to a buffer with these segment levels [99%, 3%]. This
    // operation will yield the following segments: [100%, 2%, 99%, 3%]. That
    // is, we do not spend time copying bytes around to achieve more efficient
    // memory use like [100%, 100%, 4%].
    //
    // When combining buffers, we will compact adjacent buffers when their
    // combined level doesn't exceed 100%. For example, when we start with
    // [100%, 40%] and append [30%, 80%], the result is [100%, 70%, 80%].
    //
    //
    // Splitting segments
    //
    // Occasionally we write only part of a source buffer to a sink buffer. For
    // example, given a sink [51%, 91%], we may want to write the first 30% of
    // a source [92%, 82%] to it. To simplify, we first transform the source to
    // an equivalent buffer [30%, 62%, 82%] and then move the head segment,
    // yielding sink [51%, 91%, 30%] and source [62%, 82%].

    if (source == null) throw new IllegalArgumentException("source == null");
    if (source == this) throw new IllegalArgumentException("source == this");
    checkOffsetAndCount(source.size, 0, byteCount);

    while (byteCount > 0) {
      // Is a prefix of the source's head segment all that we need to move?
     // 如果 Source Buffer 的头结点可用字节数大于要写出的字节数
      if (byteCount < (source.head.limit - source.head.pos)) {
        //取到当前buffer的尾节点
        Segment tail = head != null ? head.prev : null;
        // 如果尾部结点有足够空间可以写数据,并且这个结点是底层数组的拥有者
        if (tail != null && tail.owner
            && (byteCount + tail.limit - (tail.shared ? 0 : tail.pos) <= Segment.SIZE)) {
          // Our existing segments are sufficient. Move bytes from source's head to our tail.
          //source头结点的数据写入到当前尾节点中,然后就直接结束返回了
          source.head.writeTo(tail, (int) byteCount);
          source.size -= byteCount;
          size += byteCount;
          return;
        } else {
          // We're going to need another segment. Split the source's head
          // segment in two, then move the first of those two to this buffer.
          //如果尾节点空间不足或者不是持有者,这时就需要把 Source Buffer 的头结点分割为两个 Segment,
          //然后将source的头指针更新为分割后的第一个Segment, 如[92%, 82%]变成[30%, 62%, 82%]这样
          source.head = source.head.split((int) byteCount);
        }
      }

      // Remove the source's head segment and append it to our tail.
      //从 Source Buffer 的链表中移除头结点, 并加入到当前Buffer的链尾
      Segment segmentToMove = source.head;
      long movedByteCount = segmentToMove.limit - segmentToMove.pos;
      //移除操作,并移动更新source中的head
      source.head = segmentToMove.pop();
       // 如果当前buffer的头结点为 null,则头结点直接指向source的头结点,初始化双向链表
      if (head == null) {
        head = segmentToMove;
        head.next = head.prev = head;
      } else {
        //否则就把Source Buffer的 head 加入到当前Buffer的链尾
        Segment tail = head.prev;
        tail = tail.push(segmentToMove);//压入链尾,并更新尾节点
        tail.compact();//尾节点尝试合并,如果合并成功,则尾节点会被SegmentPool回收掉
      }
      source.size -= movedByteCount;
      size += movedByteCount;
      byteCount -= movedByteCount;
    }
  }
主要就是在这个 write(Buffer source, long byteCount) 方法中实现的,这个方法前面有大段的英文注释,我从源码中直接复制过来的,我们可以翻译过来理解一下说的是啥:
将字节数据从 source buffer 的头节点复制到当前buffer的尾节点中,这里主要需要平衡两个相互冲突的目标:CPU 和 内存。
不要浪费 CPU(即不要复制全部的数据)。
复制大量数据代价昂贵。相反,我们更喜欢将整个段从一个缓冲区重新分配到另一个缓冲区。
不要浪费内存。
Segment作为一个不可变量,缓冲区中除了头节点和尾节点的片段以外,相邻的片段,至少应该保证
50%以上的数据负载量(指的是Segment中的data数据, Okio 认为data数据量在50%以上才算是被有效利用的)。由于头结点中需要读取消耗字节数据,而尾节点中需要写入产生字节数据,因此头结点和尾节点是不能保持不变性的。在缓冲区之间移动片段
在将一个缓冲区写入另一个缓冲区时,我们更喜欢重新分配整个段,将字节复制到最紧凑的形式。假设我们有一个缓冲区,其中的片段负载为
[91%,61%],如果我们要在这上面附加一个负载量为[72%]的单一片段,这样将产生的结果为[91%,61%,72%]。这期间不会进行任何的字节复制操作。(即空间换时间,牺牲内存,提供速度)再假设,我们有一个缓冲区负载量为:
[100%,2%],并且我们希望将其附加到一个负载量为[99%,3%]的缓冲区中。这个操作将产生以下部分:[100%、2%、99%、3%],也就是说,我们不会花时间去复制字节来提高内存的使用效率,如变成[100%,100%,4%]这样。(即这种情况下 Okio 不会采取时间换空间的策略,因为太浪费CPU)在合并缓冲区时,当相邻缓冲区的合并级别不超过
100%时,我们将压缩相邻缓冲区。例如,当我们在[100%,40%]基础上附加[30%,80%]时,结果将会是[100%,70%,80%]。(也就是中间相邻的负载为 40% 和 30% 的两个 Segment 将会被合并为一个负载为 70% 的 Segment )
分割片段
有时我们只想将 source buffer 中的一部分写入到sink buffer当中,例如,给定一个sink为
[51%,91%],现在我们想要将一个source为[92%,82%]的前30%写入到这个sinkbuffer 当中。为了简化,我们首先将 source buffer 转换为等效缓冲区[30%,62%,82%](即拆分Segment),然后移动 source 的头结点 Segment 即可,最终生成 sink[51%,91%,30%]和 source[62%,82%]。
这里的注释基本上已经说明了这个方法的意图实现过程,主要是通过移动 source 头结点的指向,另外配合分割/合并Segment的操作来平衡 CPU 消耗和内存消耗的两个目标。
Segment 的合并过程:
假设初始两个 Buffer 中的 Segment 链表如下:

现在将第二个 Buffer 完全写入到第一个 Buffer: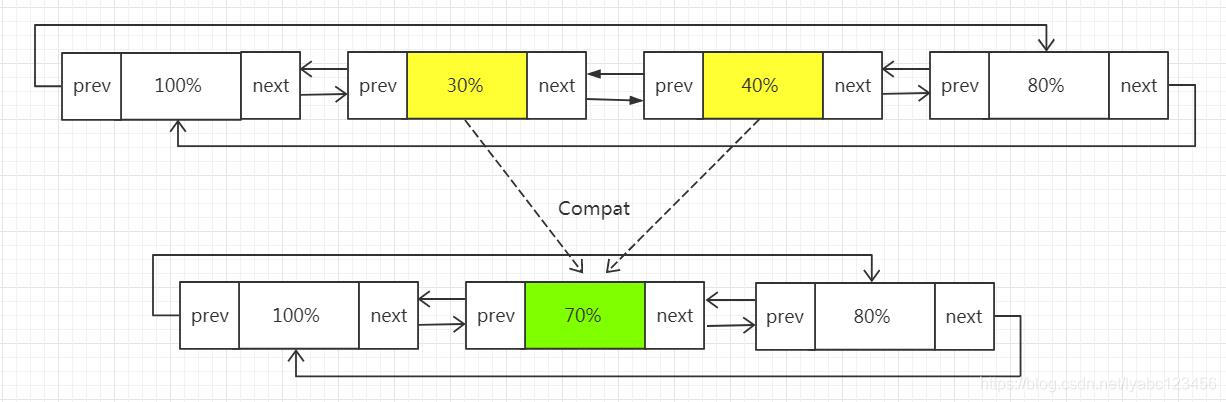
首先,它会直接将第二个 Buffer 的头节点连接到第一个 Buffer 的链尾,然后尝试将链尾的两个 Segment 进行合并,如果合并成功,则在合并之后,图中 40% 的那个 Segment 会被SegmentPool 回收,它的数据完全写入到 30% 的那个 Segment 中,最终生成一个70% 的 Segment,这样就达到了节约内存的目标。
Segment 的拆分过程:
假设初始两个 Buffer 中的 Segment 链表如下:
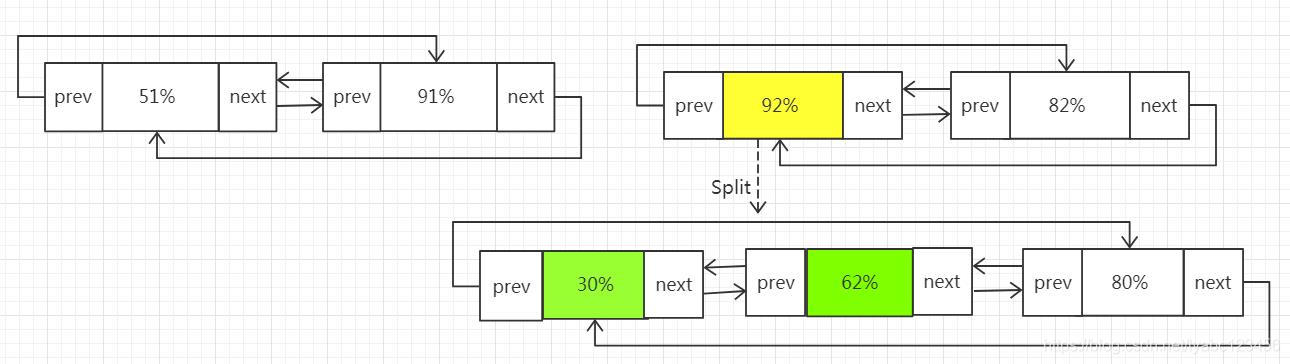
现在要从第二个Buffer中取前30%的数据写入到第一个Buffer当中,那么首先会将第二个Buffer的头结点Segment进行分割,分割为两个负载为30%和62%的Segment, 接下来移动这个新的30%的Segment节点到第一个Buffer的链表的尾部:

这样就完成了从第二个Buffer取30%的数据写入到第一个Buffer当中的工作。
超时机制
Okio的亮点之一就是增加了超时机制,防止因为意外导致I/O一直阻塞的问题,默认的超时机制是同步的。AsyncTimeout是Okio中异步超时机制的实现,它是一个单链表,结点按等待时间从小到大排序,head是一个头结点,起占位作用。使用了一个WatchDog的后台线程来不断的遍历所有节点,如果某个节点超时就会将该节点从链表中移除,并关闭Socket。
AsyncTimeout提供了3个方法enter、exit、timeout,分别用于流操作开始、结束、超时三种情况调用。
public class AsyncTimeout extends Timeout {
    //头结点,占位使用
    static
    AsyncTimeout head;

    //是否在链表中
    private boolean inQueue;

    //后继节点
    private
    AsyncTimeout next;

    //超时时间
    private long timeoutAt;
    //把当前AsyncTimeout对象加入节点
    public final void enter() {
        ...
        scheduleTimeout(this, timeoutNanos, hasDeadline);
    }

    private static synchronized void scheduleTimeout(
            AsyncTimeout node, long timeoutNanos, boolean hasDeadline) {
        //创建占位头结点并开启子线程
        if (head == null) {
            head = new AsyncTimeout();
            new Watchdog().start();
        }

        ...

        //插入到链表中,按照时间长短进行排序,等待事件越长越靠后
        for (AsyncTimeout prev = head; true; prev = prev.next) {
            if (prev.next == null || remainingNanos < prev.next.remainingNanos(now)) {
                node.next = prev.next;
                prev.next = node;
                if (prev == head) {
                    AsyncTimeout.class.notify(); // Wake up the watchdog when inserting at the front.
                }
                break;
            }
        }
    }

    //从链表中移除节点
    public final boolean exit() {
        if (!inQueue) return false;
        inQueue = false;
        return cancelScheduledTimeout(this);
    }

    //执行真正的移除操作
    private static synchronized boolean cancelScheduledTimeout(AsyncTimeout node) {
        // Remove the node from the linked list.
        for (AsyncTimeout prev = head; prev != null; prev = prev.next) {
            if (prev.next == node) {
                prev.next = node.next;
                node.next = null;
                return false;
            }
        }

        // The node wasn't found in the linked list: it must have timed out!
        return true;
    }

    //在子类中重写了该方法,主要是进行socket的关闭
    protected void timedOut() {
    }

    //监听节点是否超时的子线程
    private static final class Watchdog extends Thread {
        Watchdog() {
            super("Okio Watchdog");
            setDaemon(true);
        }

        public void run() {
            while (true) {
                try {
                    AsyncTimeout timedOut;
                    synchronized (AsyncTimeout.class) {
                        timedOut = awaitTimeout();
                        //代表头结点的后继节点已超时,
                        if (timedOut == null) continue;
                        //除头结点外没有任何其他节点
                        if (timedOut == head) {
                            head = null;
                            return;
                        }
                    }

                    //关闭socket
                    timedOut.timedOut();
                } catch (InterruptedException ignored) {
                }
            }
        }
    }


    static AsyncTimeout awaitTimeout() throws InterruptedException {
        AsyncTimeout node = head.next;
        //除了头结点外没有任何其他节点
        if (node == null) {
            long startNanos = System.nanoTime();
            AsyncTimeout.class.wait(IDLE_TIMEOUT_MILLIS);
            return head.next == null && (System.nanoTime() - startNanos) >= IDLE_TIMEOUT_NANOS
                    ? head  // The idle timeout elapsed.
                    : null; // The situation has changed.
        }

        long waitNanos = node.remainingNanos(System.nanoTime());

        //进行等待
        if (waitNanos > 0) {
            //等待
            long waitMillis = waitNanos / 1000000L;
            waitNanos -= (waitMillis * 1000000L);
            AsyncTimeout.class.wait(waitMillis, (int) waitNanos);
            return null;
        }

        //代表node节点已超时
        head.next = node.next;
        node.next = null;
        return node;
    }
}
默认都是未设置超时时间的,需要我们自己来设置,同步及异步的超时时间设置方式是一样的,通过下面代码即可。
    sink.timeout().deadline(1, TimeUnit.SECONDS);
    source.timeout().deadline(1,TimeUnit.MILLISECONDS);
生产者/消费者模型
在 Okio 中可以使用 Pipe 来实现一个生产者/消费者模型。Pipe 维护了一个一定大小 Buffer。当该 Buffer 容量达到最大时,线程就会等待直到该 Buffer 有剩余的空间。
public final class Pipe {
  //Pipe的最大容量
  final long maxBufferSize;
  //Pipe对应的Buffer
  final Buffer buffer = new Buffer();
  boolean sinkClosed;
  boolean sourceClosed;
  //写入流,对应着生产者
  private final Sink sink = new PipeSink();
  //读取流,对应着消费者
  private final Source source = new PipeSource();

  public Pipe(long maxBufferSize) {
    //最大容量不能小于1
    if (maxBufferSize < 1L) {
      throw new IllegalArgumentException("maxBufferSize < 1: " + maxBufferSize);
    }
    this.maxBufferSize = maxBufferSize;
  }
  ...
  //写入数据到Pipe中
  final class PipeSink implements Sink {
    final Timeout timeout = new Timeout();

    @Override public void write(Buffer source, long byteCount) throws IOException {
      synchronized (buffer) {
        ...

        while (byteCount > 0) {
          ...

          long bufferSpaceAvailable = maxBufferSize - buffer.size();
          if (bufferSpaceAvailable == 0) {
            //buffer中,没有剩余空间,等待消费者消费
            timeout.waitUntilNotified(buffer); // Wait until the source drains the buffer.
            continue;
          }

          long bytesToWrite = Math.min(bufferSpaceAvailable, byteCount);
      // 将数据写入到 buffer的 data 中           buffer.write(source, bytesToWrite);
 // 还需要写多少数据           byteCount -= bytesToWrite;
          //通知buffer,有新的数据了,
          buffer.notifyAll(); // Notify the source that it can resume reading.
        }
      }
    }

    ...
  }
  //从 Pipe 中读取数据
  final class PipeSource implements Source {
    final Timeout timeout = new Timeout();

    @Override public long read(Buffer sink, long byteCount) throws IOException {
      synchronized (buffer) {
        ...

        while (buffer.size() == 0) {
          if (sinkClosed) return -1L;
          //Pipe中没有数据,等待生产者写入
          timeout.waitUntilNotified(buffer); // Wait until the sink fills the buffer.
        }

        long result = buffer.read(sink, byteCount);
        buffer.notifyAll(); // Notify the sink that it can resume writing.
        return result;
      }
    }
    ...
  }
}
Pipe 的代码还是比较少的。简单说下 pipe 的实现原理,其实就是内部维护了一个 buffer 用来存储数据,可读可写;
-
当读数据的时候,就会减少 buffer 里面数据的容量,同时通过 buffer.notifyAll() 告诉外界状态发生了变化;
-
当写数据的时候,只能添加最大容量的数据,写好数据之后,就会通过 buffer.notifyAll() 告诉外界状态发生了变化;
下面就来如何使用 Pipe。
    public void pipe() throws IOException {
        //设置 Pipe 的容量为1024字节,即 1kb
        Pipe pipe = new Pipe(1024);
        new Thread(new Runnable() {
            @Override
            public void run() {
          //1 pipe.source 会从 pipe 的 buffer 中读取数据 try (BufferedSource bufferedSource = Okio.buffer(pipe.source())) {
                    //2 将Pipe中数据写入env4.txt这个文件中,;
                    bufferedSource.readAll(Okio.sink(new File("file/env4.txt")));
                } catch (IOException e) {
                    e.printStackTrace();
                }
            }
        }).start();

        new Thread(new Runnable() {
            @Override
            public void run() {
          //3 pipe.sink 会将数据写入到 pipe 的 buffer 中 try (BufferedSink bufferedSink = Okio.buffer(pipe.sink())) {
                    //4 将env3.txt中数据写入到Pipe中;
                    bufferedSink.writeAll(Okio.source(new File("file/env3.txt")));
                } catch (IOException e) {
                    e.printStackTrace();
                }
            }
        }).start();
    }
这里我会简单解释下,按照注释标的数字:
-
Okio.buffer(pipe.source()) 创建一个 source ,可以用于读取数据;
-
Okio.sink(new File(“file/env4.txt”)) 创建一个 sink,在调用 bufferedSource.readAll (sink ),意思就是 bufferedSource 将自身 buffer (pipe 中的 buffer 数据)的数据给 sink。
-
Okio.buffer(pipe.sink()) 创建一个 sink ,可以写数据;
-
Okio.source(new File(“file/env3.txt”)) 创建一个 source , bufferedSink.writeAll(source) 意思就是从 source 里面获取数据添加到自身的 buffer (pipe 中的 buffer 数据)
本文到这里结束。 参考文章:
https://juejin.cn/post/6844904195707912200
https://blog.csdn.net/lyabc123456/article/details/88830541
https://juejin.cn/post/6844903785236545549
https://blog.csdn.net/lyabc123456/article/details/89106168