Topic通讯和代码练习
- 四、Topic通讯
-
- 4.1 Publisher创建
- 4.2 Publisher调试
-
- 4.2.1 rostopic工具(命令行)
- 4.2.2 rqt_topic工具(可视化)
- 4.3 Subscriber创建
- 4.4 Subscriber调试
-
- 4.4.1 publisher(程序)
- 4.4.2 rostopic工具(命令行)
- 4.4.3 rqt_topic工具(可视化)
- 4.5 Topic命令行工具
- 五、Topic通讯练习
-
- 5.1 小乌龟节点启动
- 5.2 节点信息查看
-
- 5.2.1 查看小乌龟节点
- 5.2.2 可视化工具查询
- 5.3 调试工具调试小乌龟
-
- 5.3.1. rqt_publisher模拟数据发送
- 5.3.2 通过命令行模拟数据发送
- 5.4 小乌龟案例(代码练习)
-
- 5.4.1 turtle_ctrl.py
- 5.4.2 windows.py
- 5.5 控制板驱动
-
- 5.5.1 与下位机通讯
- 5.5.2 电机主题订阅
- 5.5.3 编码器功能实现
四、Topic通讯
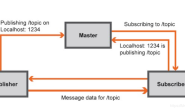
Node间进行通讯,其中发送消息的一方,ROS将其定义为 Publisher(发布者) ,将接收消息的一方定义为 Subscriber(订阅者) 。 考虑到消息需要广泛传播,ROS没有将其设计为点对点的单一传递,而是由 Publisher 将信息发布到 Topic(主题) 中,想要获得消息的任何一方都可以到这个 Topic 中去取数据。
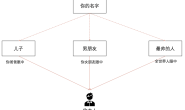
- 广播站好比是
publisher - 收音机好比是
subscriber - 收听频段好比是
topic主题 - 广播站不停的往外广播消息,不关心是否有谁去接收
- 多个收音机可以去 同一个频段收听广播,收听到的内容是相同的
4.1 Publisher创建
工作空间下创建功能包
cd ros_ws/first_ws/src
catkin_create_pkg hello_topic rospy roscpp rosmsg
使用Clion打开目录 hello_topic ,在 scripts 目录下新建Python文件 publisher_node 创建节点
rospy.init_node('publisher_node')
创建发布者
publisher = rospy.Publisher(topic_Name, String, queue_size=100)
第一个参数为
topic名 第二个参数为发布的消息类 第三个参数为topic中消息队列最多的数量。
此时应在开头添加
from std_msgs.msg import String
定时发布消息
rate = rospy.Rate(4)
count = 0
while not rospy.is_shutdown():
	# 往外发送数据
    msg = String()
    msg.data = 'hello topic {}'.format(count)
    publisher.publish(msg)
    rate.sleep()
    count += 1
完整代码如下
#!/usr/bin/env python
# -*- coding: utf-8 -*-
# @Time : 6/9/20 7:06 AM
# @Author : Chenan_Wang
# @File : publisher_node.py
# @Software: CLion

import rospy
from std_msgs.msg import String

if __name__ == '__main__':
    # 创建节点
    rospy.init_node('publisher_node')

    # topic name 主题名称,唯一标示作用(类似于广播频段)
    # 命名规则 ‘/a/b/c/d'
    topic_name = '/hello/publisher'
    # date_class:数据类型 目前暂时使用 字符串
    publisher = rospy.Publisher(topic_name, String, queue_size=100)

    count = 0

    rate = rospy.Rate(4)

    while not rospy.is_shutdown():
        # 往外发送数据
        msg = String()
        msg.data = 'hello topic {}'.format(count)
        publisher.publish(msg)

        rate.sleep()
        count += 1
4.2 Publisher调试
4.2.1 rostopic工具(命令行)
查看所有的主题
rostopic list
打印主题所发布的信息
rostopic echo /hello/publisher
4.2.2 rqt_topic工具(可视化)
通过命令启动rqt_topic工具
rosrun rqt_topic rqt_topic
选中要调试的主题

4.3 Subscriber创建
在 scripts 目录下新建Python文件 publisher_node 创建节点
rospy.init_node('subscriber_node')
创建订阅者
rospy.Subscriber(topic_name, String, topic_callback)
rospy.spin()
实现订阅回调
def topic_callback(msg):
    print msg
完整代码如下
#!/usr/bin/env python
# -*- coding: utf-8 -*-
# @Time : 6/9/20 7:55 AM
# @Author : Chenan_Wang
# @File : subscriber_node.py
# @Software: CLion

import rospy
from std_msgs.msg import String


def topic_callback(msg):
    print msg


if __name__ == '__main__':
    # 创建节点
    rospy.init_node('subscriber_node')

    # 订阅topic消息,subscriber
    topic_name = '/hello/itcast'

	# 创建订阅者
    subscriber = rospy.Subscriber(topic_name, String, topic_callback)

    # callback是异步回调:会在另一个线程进行调用,所以需要阻塞:spin
    rospy.spin()
4.4 Subscriber调试
4.4.1 publisher(程序)
rosrun hello_topic publisher_node.py
4.4.2 rostopic工具(命令行)
查询主题所需要的数据类型
rostopic type /hello/publisher
模拟发布数据
rostopic pub /hello/publisher std_msgs/String hello -r 10
rostopic pub是模拟发布数据的命令/hello/publisher是将数据发送到那个主题,根据自己实际调试的主题来写std_msgs/String是这个主题所需要的数据类型,通过rostopic type /hello/publisher查询出来hello是发送的数据,根据自己的调试需求来写-r指的是发送频率
4.4.3 rqt_topic工具(可视化)
通过命令启动rqt_publisher工具
rosrun rqt_publisher rqt_publisher

4.5 Topic命令行工具
查询所有的topic
rostopic list
查询topic详情
rostopic info
查询topic传输数据类型
rostopic type topic名称
查询topic传输数据的带宽
rostopic bw topic名称
调试publisher数据,模拟数据接收
rostopic echo topic名称
调试subscriber,模拟数据发送
rostopic pub topic名称 topic数据类型 topic数据 参数
五、Topic通讯练习
5.1 小乌龟节点启动
启动小乌龟模拟器节点
rosrun turtlesim turtlesim_node
启动小乌龟键盘输入节点
rosrun turtlesim turtle_teleop_key
启动完成后,可以通过键盘输入操控小乌龟移动 键盘操控时,光标一定要在命令行上
5.2 节点信息查看
5.2.1 查看小乌龟节点
通过命令可以查看 /turtlesim 节点的详情
rosnode info /turtlesim
rosnode info命令可以查看当前节点的一些信息
Publications:此节点上定义的发布者Subscriptions:此节点上定义的订阅者Services:此节点上定义的服务Pid:占用的网络端口Connections: 此节点和其他节点间的连接信息
查看控制节点 同理,我们也可以通过rosnode info查询/teleop_turtle节点的信息,
rosnode info /teleop_turtle
5.2.2 可视化工具查询
rqt_graph 工具提供了可视化的工具方便我们查看这种节点间的关系:
rosrun rqt_graph rqt_graph

图像显示,
/teleop_turtle通过主题/turtle1/cmd_vel给turtlesim进行数据传/teleop_turtle为具备Publisher功能的节点/turtlesim为具备Subscriber功能的节点/turtle1/cmd_vel为publisher和subscriber通讯的主题
5.3 调试工具调试小乌龟
5.3.1. rqt_publisher模拟数据发送
启动rqt_publisher工具
rosrun rqt_publisher rqt_publisher
通过图形化配置参数:

5.3.2 通过命令行模拟数据发送
rostopic pub /turtle1/cmd_vel geometry_msgs/Twist "linear:
	x: 1.0
	y: 0.0
	z: 0.0
angular:
	x: 0.0
	y: 0.0
	z: 3.0"
5.4 小乌龟案例(代码练习)
5.4.1 turtle_ctrl.py
完整代码如下:
#!/usr/bin/env python
# -*- coding: utf-8 -*-
# @Time : 7/9/20 12:59 AM
# @Author : Chenan_Wang
# @File : turtle_ctrl.py
# @Software: CLion

from PyQt5.QtWidgets import *
import sys
import rospy
from window import MainWindow, TurtleWindow

if __name__ == '__main__':

    rospy.init_node('turtle_ctrl_node')

    # Qt ui部分
    app = QApplication(sys.argv)
    # 窗体展示
    Windows = TurtleWindow()
    Windows.show()

    sys.exit(app.exec_())
5.4.2 windows.py
完整代码如下:
#!/usr/bin/env python
# -*- coding: utf-8 -*-
# @Time : 7/9/20 1:04 AM
# @Author : Chenan_Wang
# @File : window.py
# @Software: CLion

from PyQt5.QtWidgets import *
from PyQt5.QtCore import *
from PyQt5.QtGui import *
import sys
import rospy
from geometry_msgs.msg import Twist     # geometry_msg/Twist
from turtlesim.msg import Pose          # turtlesim/Pose
from math import degrees, radians


class MainWindow(QWidget):
    def __init__(self):
        super(MainWindow, self).__init__()

        self.setWindowTitle('小乌龟控制')
        self.resize(400, 0)

        # 布局
        layout = QFormLayout()
        self.setLayout(layout)

        # 输入框
        self.le_linear = QLineEdit()
        self.le_angular = QLineEdit()

        # 按钮
        btn = QPushButton('发送')
        layout.addRow('线速度', self.le_linear)
        layout.addRow('线速度', self.le_angular)
        layout.addRow(btn)

        # 事件
        btn.clicked.connect(self.click_send)

        topic_name = '/turtle1/cmd_vel'
        # geometry_msgs/Twist
        self.publisher = rospy.Publisher(topic_name, Twist, queue_size=100)

    def click_send(self):
        linear = float(self.le_linear.text())
        angular = float(self.le_angular.text())

        # 通过publisher发送topic消息
        twist = Twist()
        # 线速度
        twist.linear.x = linear
        # 角速度
        twist.angular.z = angular
        self.publisher.publish(twist)


class TurtleWindow(QWidget):
    def __init__(self):
        super(TurtleWindow, self).__init__()

        # 创建自己的渲染(刷新的定时器)
        update_timer = QTimer(self)

        # 设置定时器的频率
        update_timer.setInterval(20)
        update_timer.start()

        # 监听 timer 事件
        update_timer.timeout.connect(self.on_update)
        self.setWindowTitle('小乌龟控制')
        self.resize(400, 0)

        # 布局
        layout = QFormLayout()
        self.setLayout(layout)

        # 输入框
        self.le_linear = QLineEdit()
        self.le_angular = QLineEdit()

        # 文本显示
        self.lb_x = QLabel()
        self.lb_y = QLabel()
        self.lb_linear = QLabel()
        self.lb_angular = QLabel()
        self.lb_theta = QLabel()

        # 按钮
        btn = QPushButton('发送')
        layout.addRow('线速度', self.le_linear)
        layout.addRow('角速度', self.le_angular)
        layout.addRow('X坐标', self.lb_x)
        layout.addRow('Y坐标', self.lb_y)
        layout.addRow('当前线速度', self.lb_linear)
        layout.addRow('当前角速度', self.lb_angular)
        layout.addRow('当前角度值', self.lb_theta)
        layout.addRow(btn)

        # 事件
        btn.clicked.connect(self.click_send)
        topic_name = '/turtle1/cmd_vel'

        # geometry_msgs/Twist
        self.publisher = rospy.Publisher(topic_name, Twist, queue_size=100)

        # 去订阅小乌龟的位置相关信息
        pose_topic_name = '/turtle1/pose'
        rospy.Subscriber(pose_topic_name, Pose, self.pose_callback)

    def click_send(self):

        linear = float(self.le_linear.text())
        angular = float(self.le_angular.text())

        # 角度转弧度
        angular = radians(angular)
        # 通过publisher发送topic消息
        twist = Twist()
        # 线速度
        twist.linear.x = linear
        # 角速度
        twist.angular.z = angular
        self.publisher.publish(twist)

    def pose_callback(self, msg):
        if not isinstance(msg, Pose): return

        # 赋值操作
        self.lb_x.setText(str(msg.x))
        self.lb_y.setText(str(msg.y))
        self.lb_linear.setText(str(msg.linear_velocity))
        self.lb_angular.setText(str(msg.angular_velocity))
        self.lb_theta.setText(str(degrees(msg.theta)))

    def on_update(self):
        # 手动渲染ui
        self.update()

        if rospy.is_shutdown():
            # 关闭
            # 需要关闭ui窗口
            self.close()
5.5 控制板驱动
5.5.1 与下位机通讯
完整代码如下:
#!/usr/bin/env python
# -*- coding: utf-8 -*-
# @Time : 12/9/20 7:46 PM
# @Author : Chenan_Wang
# @File : driver_node.py
# @Software: CLion

import rospy

import serial  # 串口
import struct

if __name__ == '__main__':
    # 创建节点
    rospy.init_node('my_driver_node')
    ser = serial.Serial(port='dev/ttyUSB0', baudrate=115200)

    # 电机驱动
    pack = struct.pack('h', 5000)
    data = bytearray([0x03, pack[0], pack[1]])
    ser.write(data)

    rospy.spin()
5.5.2 电机主题订阅
完整代码如下:
#!/usr/bin/env python
# -*- coding: utf-8 -*-
# @Time : 12/9/20 7:46 PM
# @Author : Chenan_Wang
# @File : driver_node.py
# @Software: CLion

import rospy

import serial  # 串口
import struct
from std_msgs.msg import Int32


def motor_callback(msg):
    if not isinstance(msg, Int32): return
    # 接收到其他节点发送的数据
    pwm = msg.data
    # 给下位机发送指令
    # 电机驱动
    pack = struct.pack('h', pwm)
    data = bytearray([0x03, pack[0], pack[1]])
    ser.write(data)


if __name__ == '__main__':
    # 创建节点
    rospy.init_node('my_driver_node')

    # 串口创建
    # 重试机制
    count = 0
    while count < 10:
        count += 1
        try:
            ser = serial.Serial(port='/dev/ttyUSB0', baudrate=115200)
            # 如果出错了,后面的代码就不执行了
            # 能到达这个位置说明,链接成功
            break
        except Exception as e:
            print(e)

    # 创建一个电机指令的订阅者
    motor_topic_name = '/motor'
    rospy.Subscriber(motor_topic_name, Int32, motor_callback)

    rospy.spin()
5.5.3 编码器功能实现
完整代码如下:
#!/usr/bin/env python
# -*- coding: utf-8 -*-
# @Time : 12/9/20 7:46 PM
# @Author : Chenan_Wang
# @File : driver_node.py
# @Software: CLion

import rospy

import serial  # 串口
import struct
from std_msgs.msg import Int32, Float32


def motor_callback(msg):
    if not isinstance(msg, Int32): return
    # 接收到其他节点发送的数据
    pwm = msg.data
    # 给下位机发送指令
    # 电机驱动
    pack = struct.pack('h', pwm)
    data = bytearray([0x03, pack[0], pack[1]])
    ser.write(data)


if __name__ == '__main__':
    # 创建节点
    rospy.init_node('my_driver_node')

    # 串口创建
    # 重试机制
    count = 0
    while count < 10:
        count += 1
        try:
            ser = serial.Serial(port='/dev/ttyUSB0', baudrate=115200)
            # 如果出错了,后面的代码就不执行了
            # 能到达这个位置说明,链接成功
            break
        except Exception as e:
            print(e)

    # 创建一个电机指令的订阅者
    motor_topic_name = '/motor'
    rospy.Subscriber(motor_topic_name, Int32, motor_callback)

    # 编码器
    encorder_topic_name = '/rpm'
    rpm_publisher = rospy.Publisher(encorder_topic_name, Float32, queue_size=100)
    # 和下位机进行通讯
    while not rospy.is_shutdown():
        # 阻塞式的函数
        read = ser.read(2)

        data = bytearray([])
        data.extend(read)
        # bytearray 数据 -> 数字类型

        data = struct.unpack('h', data)[0]
        rpm = data / 100.0

        # 将数据发布出去
        msg = Float32
        msg.data = rpm
        rpm_publisher.publish(msg)

    rospy.spin()